🌈 ESP32-S3 Rainbow: ZX Spectrum Emulator Board! Get it on Crowd Supply →
View All Posts
read
Want to keep up to date with the latest posts and videos? Subscribe to the newsletter
HELP SUPPORT MY WORK: If you're feeling flush then please stop by Patreon Or you can make a one off donation via ko-fi

In my Raspberry Pi starter kit I also got a LCD display based compatible with the Hitachi HD44780U controller.

WiringPi has some nice simple support for this.

The LCD supports being driven in 8 bit mode (which requires 10 GPIO pins) and 4 bit mode (which required 6 GPIO pins). Although you can use all 17 GPIO pins for your own purposes I want to keep the I2C, UART and SPI functionality free for further projects, which means I only really have 8 pins to play with. I also want to connect up my 1 wire temperature sensor and later on my infrared sensor. This means that even using the LCD in 4 bit mode I’m going to be running out of pins.

Fortunately the GPIO is quite extensible using the I2C or SPI pins. The simplest way to do this is to use the MCP23S17 which is supported by WiringPi.

The Pi has 4 pins supporting SPI:

  • CEO, CE1 - chip select pins
  • SCLCK - Clock
  • MISO - Master in, slave out
  • MOSI - Master out, slave in

Connecting the MCP23S17 is simply a case of connecting these pins up.

  • PIN 11 (CS) -> CE0 (or CE1)
  • PIN 12 (SCK) -> SCLCK
  • PIN 14 (SO) -> MISO
  • PIN 13 (SI) -> MOSO
  • PIN 9 (VSS) -> 3v
  • PIN 10 (VDD) -> GND
  • PIN 15-17 (A0-A2) -> GND - This sets the address of our chip to ‘0’
  • PINT 18 (_RESET) -> 3V - Don’t forget this like I did - you’ll be scratching your head for a while


You can then connect whatever you want to pint 21-28 and 1-8.

Connecting up the LCD display should be straightforward. I was fortunate that the pins on my connector married up really nicely with the pins on the MCP23S17 as shown here:
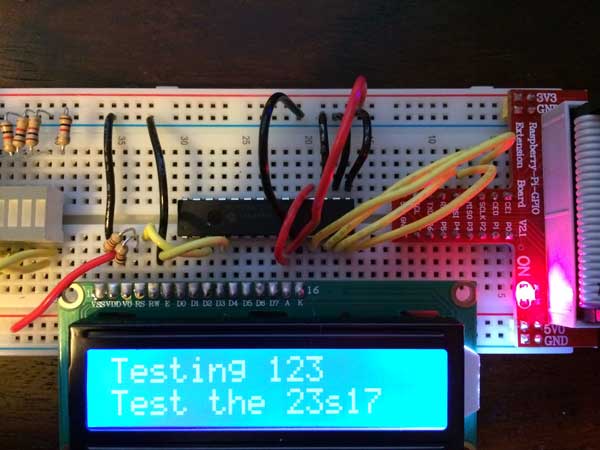
lcd

A and K (Anode and Cathode) for the back-light are connected the VSS and VDD pins - I’m able to do that with my module because it has a built in resistor - you should check your module first!

The data pins for the LCD match up with pins 1-8 on the MCP23S17. I’m going to use the LCD in 4 bit mode so I can use a couple of these pins to drive the E and RS connections on the LCD.

If your LCD module is 5v, make sure you tie the RW pin to ground.

VSS is connected to 5v and VDD is connected to GND.

V0 controls the contrast - initially I had this wired up to a 10K pot, but once I’d found a good setting I replaced that with two resistors dividing +5 and GND.

That’s it for the wiring up. To make it do something we have to install wiringPi and write some simple code.

#include <stdio.h>
#include <wiringPi.h>
#include <mcp23s17.h>
#include <lcd.h>

#define BASE    100

int main (void)
{
        wiringPiSetup () ;
        mcp23s17Setup (BASE, 0, 0) ;
        int fd = lcdInit(2, 16, 4, BASE + 10, BASE + 11, BASE + 12, BASE + 13, BASE + 14, BASE + 15, 0, 0, 0, 0);

        lcdHome (fd);
        lcdClear (fd);

        lcdPuts(fd, "Testing 123");
        lcdPosition(fd, 0, 1);
        lcdPuts(fd, "Test the 23s17");
}

The first step is to initialise wiringPi. We then need to initialise the SPI mcp23s17 as shown here. The first number (BASE) is our pin offset, the second number is the SPI port (0 or 1) and the third number is the address/device id.

For the LCD we we give the number of rows, columns and bits (4 or 8) and then list the pins as detailed here.

To compile and run this program you have to link with wiringPi and wiringPiDev and before running you have to load up the spi driver module.

g++ spi.c -L/usr/local/lib -lwiringPi -lwiringPiDev
gpio load spi
sudo ./a.out

With the 3 address lines and two chip selects you could potentially connect up 16 extenders to your Pi giving you 256 IO pins!

Related Posts

Raspberry Pi temperature sensor - In just a bit of time, I managed to successfully get my temperature sensor, the DS18B20, up and running on my new Raspberry Pi. My starter kit even included a ready made circuit board for the sensor, making wiring a no-brainer. After following the setup instructions and inputting a few commands, voilĂ , my temperature readouts were coming in loud and clear. Ready to tinker around and perhaps even move the connection pin if needed.
ESP32-S3 Hardware SPI on the Adafruit ST7789 - I've had some commenters point out the issue with the slow display updates in my recent Arduino Nano ESP32 video. It turns out, the software SPI of the Adafruit_ST7789 library was the culprit. Lo and behold, the solution is simple - using the hardware SPI constructor of the library. Apparently, this isn't well documented, so I wrote some code to serve as reference for myself and others who might run into the same snags. Trust me, the difference in speed is absolutely bonkers. Check out the video to see the magic in action.
Raspberry pi Infrared Receiver - In this fun tech adventure, I successfully managed to sync my infrared receiver to my Raspberry Pi. This involved correctly wiring up my IR sensor, installing and setting up LIRC, and creating a new lirc config file. I explained each step in detail and shared my major milestones, which included seeing a list of pulses when the remote was pointed at the receiver. Now my Raspberry Pi is fully controlled by my remote.
When “Software Bugs” Are Actually Bad Soldering - A quick MLX90640 IR camera test turned into a dead-on-I2C mystery. I ran the usual checks—addresses, pull-ups, voltages, wiring—and even fixed my forgotten UART/I2C jumper, but still nothing. A peek under the microscope revealed sketchy solder on the 3V3 LDO; a quick reflow and the sensor sprang to life. Lesson relearned: don’t trust factory soldering, look early with a microscope, and stop blaming software when the hardware’s silent.
Self Organising WS2811 LEDs - I've successfully used addressable WS2811 LED strings and an ESP-CAM board to create an adjustable lighting system. The best part is that the image processing code can be duplicated in JavaScript which allows you to use a plain dev board to drive the LEDs instead of needing a camera on your ESP32 board. If you want to replicate this project, you'll need your own ESP32 dev board and some addressable LEDs. After figuring out the location of each LED in 2D space, it's easy to map from each LED's x and y location onto a pattern you want to show on the frame buffer. Desiring to keep it accessible, I've posted detailed instructions and my sample code on GitHub, making sure anyone with basic knowledge can undertake this fun technological DIY project!

Related Videos

Live GPIO Viewer - In my latest discovery, I found an incredibly efficient visualization tool from the last outpost workshop that upgrades how I check the status of the GPIO pins on my ESP32. It's super simple to use and allows me to monitor pin activities directly. I set up a couple of LEDs and a button on various GPIO pins to demonstrate its effectiveness and the results were fantastic. Although it currently supports only digital input and output and PWM, I'm optimistic it will expand with time. Thanks to the open-source community, you can find the setup instructions in a GitHub repo. This tool is a revelation and I highly recommend it.
ESP32-S3 - Which Pins Are Safe To Use? - In this video, I've decided to dive deep into the ESP32-S3, a module ruling my lab recently due to its plug-in-and-play functionality, and the flexibility offered by its GPIO matrix. However, working with it requires vigilance, especially with regard to the strapping pins and USB data pins, among others. Discovering such quirks, I've encountered unexpected values, short glitches and the occasional code crash. To help you avoid these bumps, I've documented everything I've learned on my GitHub repo, where I'm inviting you, my fellow makers and engineers, to contribute your valuable experiences and findings. After a minor hiccup with my ESP32-TV, expect an updated PCB design, courtesy of PCBWay. Explore the ESP32-S3 with me, and let's unravel its secrets together, one pull request at a time.
I Spent Hours Debugging My Software
 - Quick bench update: I tried to get a 32×24 pixel IR module talking over I2C and it just would not play ball—pull-ups, library swaps, address scans, nothing. First silly mistake was not bridging the I2C jumper. Even after fixing that, still dead. Under the microscope I spotted the real issue: poorly soldered pins on the IC. A quick reflow and some IPA cleanup later, it sprang to life. Moral of the story: if yours won’t talk, check the underside soldering. Project video coming soon.
I Built My Own ESP32-S3 Board
 And It Actually Works! - I finally assembled my super simple ESP32‑S3 dev board—voltage regulator, reset button, three status LEDs (5V, 3.3V, and a GPIO blinker), and all pins broken out. I showed two build methods: stencil + hot-plate reflow (quick, with a few USB bridges to clean up) and full hand-solder under the microscope, complete with the rigorous ‘solid’ test. Soldered the ESP32‑S3 module (skipping the center thermal pad unless you need it), plugged in, got power LEDs, confirmed USB enumeration, flashed a blink sketch, and we’ve got a blinking LED. Next up: turning this basic dev board into something more professional for production.
Super Easy ESP32-S3 Dev Board - Making an ESP32-S3 dev board is way easier than it looks. I simplify the datasheet reference: skip the external crystal, wire native USB D+/D− (pins 19/20) straight to a USB-C with 5.1k CC pulldowns, add a BOOT switch and an EN RC reset, and power it with an LD117 LDO that’s happy with ceramic caps. In KiCad I build the schematic with Espressif libraries, add LEDs for 5V, 3V3, and a blink GPIO, set up net classes, route a clean USB differential pair, stitch a solid ground plane, and label everything. It’s a bit wide—just gang breadboards together—and you end up with a neat, professional S3 dev board you can flash and debug over USB.
HELP SUPPORT MY WORK: If you're feeling flush then please stop by Patreon Or you can make a one off donation via ko-fi
Want to keep up to date with the latest posts and videos? Subscribe to the newsletter
Blog Logo

Chris Greening


Published

> Image

atomic14

A collection of slightly mad projects, instructive/educational videos, and generally interesting stuff. Building projects around the Arduino and ESP32 platforms - we'll be exploring AI, Computer Vision, Audio, 3D Printing - it may get a bit eclectic...

View All Posts