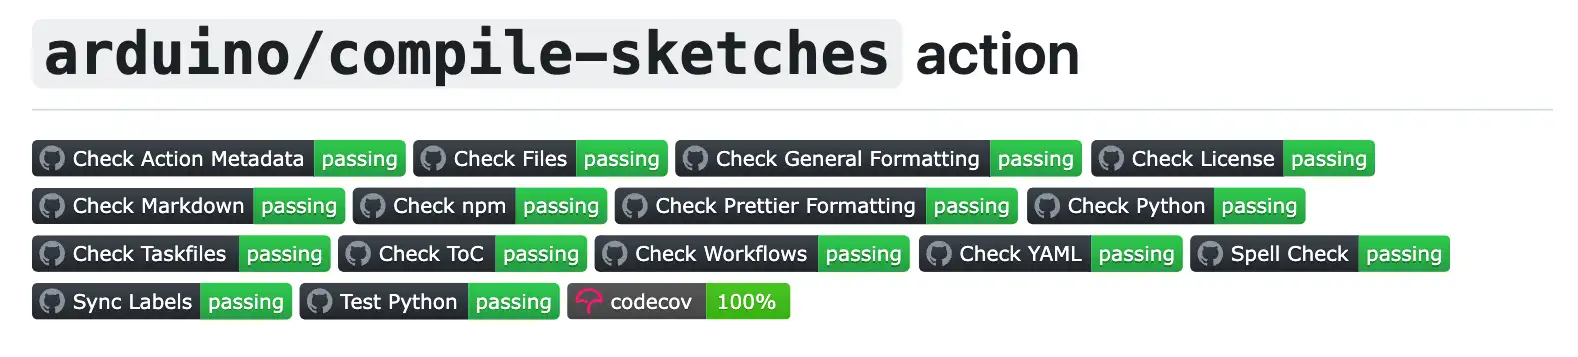
If you ever browsed around projects on GitHub, you’ll have seen these nice badges. They provide a quick and easy way to show the current status of a project, does the code buid, what’s the test coverage percentage, what’s the latest release - they are really useful.
![]()
If you prefer video, here’s a quick video that shows you how to add these badges to your project.
Now I know a lot of you will be thinking - my project is a simple Arduino sketch - what’s the point of this?
But these badges are like stickers you put on a project to share important information about its health and progress.
They help developers and non-developers quickly understand the project’s status and make informed decisions about whether to use or contribute to the project.
If you have a badge, you are more likely to attract people to your project.
There’s an added benefit that comes from adding these badges. Under the hood, your code is being constantly checked and compiled.
Not only can this alert you when you have pushed up broken code, but it can also prevent other people from breaking your project.
The typical way that people contribute to your projects is via pull requests - you can easily set things up so that their code can only be merged if it actually builds - they’ll know if it fails and can fix it themselves - all without any involvement from you.
So, how does it work? It’s very simple.
The badges and status checks are all driven off GitHub actions. To create an action just create a folder called .github and create a folder within that called workflows. Then create a file within that folder with the extension .yml. This file can be called whatever you want - I’ve just called mine arduino_build.yml.
.github
└── workflows
    └── arduino_build.yml
The Arduino guys have already done all the hard work for you and have some great documentation - and just look at all the build badges they have on their project.
There are also actions for Platform.io here and also for the ESP-IDF here.
Here’s a very simple workflow that will build a sketch for an ESP32 project. Much of this is standard boilerplate for github action.
name: Build Arduino Sketch

on: push

jobs:
  build:
    runs-on: ubuntu-latest

    steps:
      - name: Check out repository
        uses: actions/checkout@v2

      - uses: arduino/compile-sketches@v1
        with:
          fqbn: "esp32:esp32:tinypico"
          platforms: |
            - name: esp32:esp32
              source-url: https://dl.espressif.com/dl/package_esp32_index.json
          libraries: |
            - name: Servo
          sketch-paths: |
            - sketch
We give our action a name - in this case I’ve just called it “Build Arduino Sketch”.
name: Build Arduino Sketch
We tell the action when it should run - I’ve set it up to run whenever someone pushes code to the repository.
on: push
And then we tell it what jobs to run, we just have a build job. We tell it to use the latest version of ubuntu. And then we tell it to checkout the code.
jobs:
  build:
    runs-on: ubuntu-latest

    steps:
      - name: Check out repository
        uses: actions/checkout@v2
All of this is pretty standard github workflow boilerplate - you can read their detailed documentation for more details.
Finally we have the code that builds the arduino sketch. There’s a couple of bits here that need some explanation.
      - uses: arduino/compile-sketches@v1
        with:
          fqbn: "esp32:esp32:tinypico"
          platforms: |
            - name: esp32:esp32
              source-url: https://dl.espressif.com/dl/package_esp32_index.json
          libraries: |
            - name: Servo
          sketch-paths: |
            - sketch
fqbn is the most tricky one. fqbn stands for Fully Qualified Board Name - it is comprised of the board’s core name, architecture, and board identifier.
For example, the FQBN for an Arduino Uno is “arduino:avr:uno”, where “arduino” represents the core name, “avr” represents the architecture, and “uno” represents the board identifier.
It’s pretty easy to get a complete list of all the FQBN values. You just need to make sure you have the Arduino Command Line Interface installed - if you don’t have it then you can easily install it from the official Arduino website.
You can then just run:
arduino-cli board listall
If your board isn’t listed - for example the ESP32 boards do not come as standard - then you can simply add it by following the same steps you would use from the Arduino GUI
First you add the additional URL to the board manager
arduino-cli config add board_manager.additional_urls https://dl.espressif.com/dl/package_esp32_index.json
Then you update the board index
arduino-cli core update-index
And then finally you install the esp32 boards
arduino-cli core install esp32:esp32
arduino-cli board listall
Back in the github action, if your fqbn is not part of the standard install then you need to add it to the platforms section - in this example we’re adding the esp32 boards.
platforms: |
  - name: esp32:esp32
    source-url: https://dl.espressif.com/dl/package_esp32_index.json
The next important section is the list of libraries that your sketch needs.
libraries: |
  - name: Servo
And then the final argument is the list of paths that contain sketches.
sketch-paths: |
  - sketch
It all sounds pretty complicated, but it really is very simple and the actual file is only 20 or so lines long.
With the file in place you will now have a github action that runs everytime you push up a change to your repository.
To get a nice build badge, simply go to the repository and select the “actions” tab. Select your action and then click on the three dos. You can now copy and past your badge code into your readme file. This is the live badge from my test project:
![]()
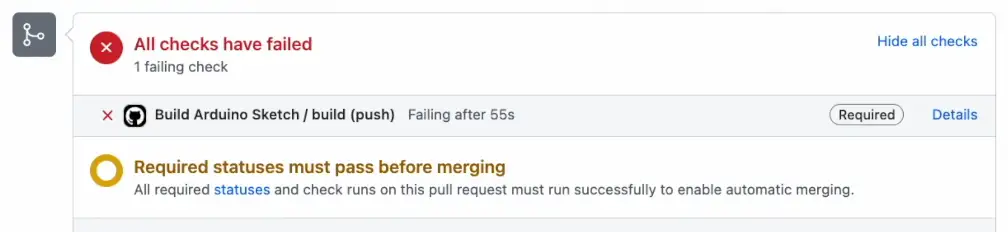
Now when we push up code to the repository the action will run and try and build the sketch.
If the build fails then we will get an email alert and the badge will turn red.
If we then fix the problem and push up a new version of the code then the badge will turn green again.
The last thing that I recommend doing is setting things up so that pull requests can only be merged if the github action passes.
To do this we go to the setting so of the repository. Then click on the branches menu option. We want to add a branch protection rule - so click on the Add Branch Protection button.
We fill in the branch name that we want to protect - typically this will be main or if you are dealing with an old repository master.
I recommend enforcing pull requests for changes.
And we want to turn on “Require status checks to pass before merging”. This will prevent merging of a pull request unless all the actions have completed successfully.
We just need to add our github action to the list of checks to pass.
Now if someone creates a pull request they will see the status checks - if they push up broken code then it will show the problem and they can fix their code.
Once they’ve fixed it and pushed up the changes then the status will change back to green - it’s magic!
That’s really all there is to it. It’s a very simple workflow that will help you to ensure that your code is always building correctly.
![]()