View All Posts
read
Want to keep up to date with the latest posts and videos? Subscribe to the newsletter
HELP SUPPORT MY WORK: If you're feeling flush then please stop by Patreon Or you can make a one off donation via ko-fi
#BATTERY CHARGING #ELECTRONICS #ESP32 #HARDWARE UPDATE #MICROPHONE #PROJECT DEVELOPMENT #USB2244

I’ve finished testing the boards - and this may be the first time I haven’t had to add any bodge wires!

Fixed in this version:

  • USB2244 and ESP32 USB conflict. We’ve added a MOSFET to keep the USB2244 reset line low so it doesn’t try and grab the USB data lines.
  • Battery charging. I’ve fixed the slightly silly error where the USB 5V was being sent straight to the battery.

Check out the previous video for details on this:

New additions to the board:

We now have a microphone!

TFT Audio Monitor

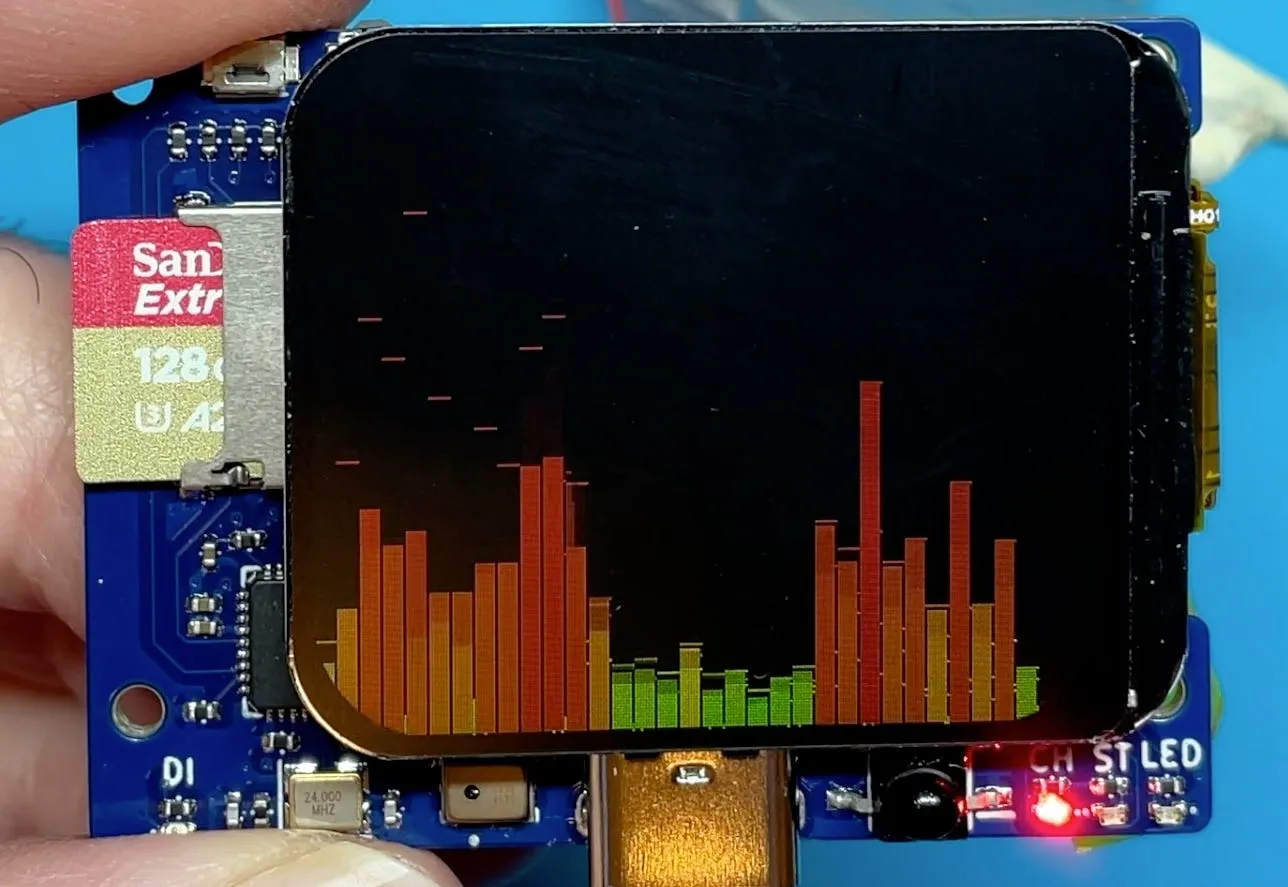
Not sure what we’ll do with this yet - but it opens up some fun projects!

#BATTERY CHARGING #ELECTRONICS #ESP32 #HARDWARE UPDATE #MICROPHONE #PROJECT DEVELOPMENT #USB2244

Related Posts

A Potentially Explosive Error - Just received the new PCBs for the ESP32-TV project and they're looking sharp with only a tiny resistor tweak needed. But I discovered a sneaky, undocumented resistor causing a conflict between the ESP32 and USB2244 over the USB connection. Fixed that, but there's a bigger issue lurking in the design - check the schematic in the video and see if you can spot it before I reveal the explosive mistake!
Minimalist Microcontroller: Building a Bare-Bones Dev Board - In a thrilling DIY endeavour, I attempted to build the most minimalist ESP32 dev board possible. Diving deep into the schematic of the ESP32 S3 WROOM module, I chopped out the non-essentials and whittled our needs down to bare bones. The experiment saw me juggling USB data lines and voltage regulators, waving goodbye to an array of capacitors and connectors and boldly embracing the simplicity of direct connections. Despite a few hitches, the miniature Frankenboard came alive, proving that sometimes less is more...at least in the world of microcontrollers.
The PCBs are in production - what have I messed up? - After some stress and trepidation, I finally took the plunge and sent my PCB design off for manufacturing. My design centers around building a large seven-segment clock with LED filaments. Jumping hurdles such as voltages, pin usage, and limiting the load on my power supply, I've settled on the ESP32 as the system's heart and come up with a final circuit design. While doing this, I've quickly realized I could improve my layout and fixed a small mistake. Also, I've prepared for either types of LED filaments - the high-voltage ones or the larger, 3v ones. However, I did bungle up a couple of things on the enable line of the shift registers and board layout. But hey, this is a learning curve, right? Can't wait to get the boards and see what other exciting errors surface!
ESP32 Audio Input - MAX4466, MAX9814, SPH0645LM4H, INMP441 - In this blog post, I've delved deep into the world of audio input for ESP32, exploring all the different options for getting analogue audio data into the device. After discussing the use of the built-in Analogue to Digital Converts (ADCs), I2S to read ADCs with DMA, and using I2S to read directly from compatible peripherals, I go on to present hands-on experiments with four different microphones (MAX4466, MAX9814, SPH0645, INPM441). This comprehensive look at getting audio into the ESP32 should be a valuable resource for anyone hungry for a deep-dive into ESP32's audio capabilities, complete with YouTube videos for an even more detailed look!
Decoding AVI Files for Fun and... - After some quality time with my ESP32 microcontroller, I've developed a version of the TinyTV and learned a lot about video and audio streaming along the way. Using Python and Wi-Fi technology, I was able to set up the streaming server with audio data, video frames, and metadata. I've can also explored the picture quality challenges of uncompressed image data and learned about MJPEG frames. Together with JPEGDEC for depth decoding, I've managed to effectively use ESP32's dual cores to achieve an inspiring 28 frames per second. Discussing audio sync, storage options and the intricacies of container file formats for video storage led me to the AVI format. The process of reading and processing AVI file headers and the listing subtype 'movi' allowed me to make significant headway in my project. All in all, I'm pretty chuffed with my portable battery powered video player. You can check out my code over on Github!

Related Videos

ESP32-TV Version 3 - Is it done? - In today's project update, I'm excited to share that my ESP32-TV boards, fresh from PCBWay, are operating flawlessly! We've successfully dealt with the USB2244 conflict with the ESP32, and the battery charging issue is now a thing of the past. We've also made some awesome additions like a microphone to our board. The real MVP though, is the USB2244 chip that’s given us significantly improved read/write speeds - making it perfect for handling video files. Next on the agenda, figuring out a solution for the non-standard display connector. As ever, there’s progress, there’s problems, and there's David Bowie animated gifs!
Can You Spot the Problem? - Buckle up folks, this video is a thrilling one! There's everything from unboxing my new ESP32 TV boards that arrived from PCB Way to discovering some hidden issues. We're talking about some pesky problems, surprises, and even a potential catastrophic error that could've led to a disaster. The main dish is the high-speed SD card access over USB - ultimately achieving a whooping transfer rate! But, the journey is a roller-coaster ride, from the project completely failing initially, to some smart hacks and triumphant moments. All the peripherals worked well, from the display to the sound amplifier and even the infrared receiver. Despite the ups and downs, there's a lot to learn and that's what makes this video exciting! Can't wait to share the improvements I have in mind for turning the prototype into the ultimate all-in-one device. But first, let's address the elephant in the room - an ill-placed diode that's a ticking bomb, because you know, safety first!
Happiness is a Working Blink Sketch - ESP32-S3 PCBs Are Here! - In this video, I explore the functions of my newly arrived little boards - essentially a PCB that an esp32 S3 room module can be connected to. I put the board's voltage regulator, battery charger, and a 3 watt class D amplifier to the test, and damn, they work perfectly! I even use breadboards, connecting them together to facilitate a wider workspace. I gave the pcbs a spin, conducting sanity checks to ensure full functionality. With a successful battery charge and impressive voltage measurements, my PCB's are up to the challenge. I also dabble in some circuit jargon, explaining schematics, amplifiers, battery chargers and a clever mosfet approach. To top it off, I solder on an ESP32 module and prove that yes, it actually works. Stay tuned for a following video where we'll work with a speaker and display!
ESP32-S3 - Which Pins Are Safe To Use? - In this video, I've decided to dive deep into the ESP32-S3, a module ruling my lab recently due to its plug-in-and-play functionality, and the flexibility offered by its GPIO matrix. However, working with it requires vigilance, especially with regard to the strapping pins and USB data pins, among others. Discovering such quirks, I've encountered unexpected values, short glitches and the occasional code crash. To help you avoid these bumps, I've documented everything I've learned on my GitHub repo, where I'm inviting you, my fellow makers and engineers, to contribute your valuable experiences and findings. After a minor hiccup with my ESP32-TV, expect an updated PCB design, courtesy of PCBWay. Explore the ESP32-S3 with me, and let's unravel its secrets together, one pull request at a time.
Lots of Stuff - And a NEW PCB! It's a rare mailbag video. - In today's episode, I'm unboxing some goodies from PCB way - my super tiny esp32 breakout boards, which I'm planning to use to recreate a mini TV complete with speakers and a display. Also received some convenient adapter boards for easier testing. Excited to explore a new Arduino Nano esp32 based on a different, tinier module, and contrasting it with other products like the Tiny Pico. Also up for testing is a new mini wear electronic load compared to my old one, and an ATX power adapter for more USB ports. I'll be testing power banks, playing with inexpensive yellow displays and nunchucks for fun gaming projects, and testing out an RGB bead curtain with hackable possibilities. Also, under my ongoing experiments is a Raspberry Pi zero, turning into a 'Doom' playing device with added sound and game controllers. Finally, an air quality measuring device for detecting air particles, CO2 levels, humidity, temperature and other parameters is up for exploration as well. A whole array of fun projects queued up, so stay tuned!
HELP SUPPORT MY WORK: If you're feeling flush then please stop by Patreon Or you can make a one off donation via ko-fi
Want to keep up to date with the latest posts and videos? Subscribe to the newsletter
Blog Logo

Chris Greening


Published

> Image

atomic14

A collection of slightly mad projects, instructive/educational videos, and generally interesting stuff. Building projects around the Arduino and ESP32 platforms - we'll be exploring AI, Computer Vision, Audio, 3D Printing - it may get a bit eclectic...

View All Posts