🌈 ESP32-S3 Rainbow: ZX Spectrum Emulator Board! Get it on Crowd Supply →
View All Posts
read
Want to keep up to date with the latest posts and videos? Subscribe to the newsletter
HELP SUPPORT MY WORK: If you're feeling flush then please stop by Patreon Or you can make a one off donation via ko-fi
#AMAZONBASICS #CONSTRUCTION #CONTACTS #DURABILITY #GOLD PLATING #HARDWARE #MICROSD ADAPTER #REPAIR #SANDISK #TEARDOWN

Are They Actually Different on the Inside?

We recently did a slightly silly—but surprisingly instructive—repair of a broken AmazonBasics microSD adapter.

In the comments, a few people quite reasonably pointed out that adapters like these are “built to a price” and probably not the highest quality. And that got me wondering:

Are cheap microSD adapters actually worse… or are they basically the same as branded ones inside?

So in this post (and the accompanying video), we crack open a cheap AmazonBasics adapter and compare it directly to a branded SanDisk adapter. NOTE - we’re not doing any speed or throughput comparisons. We’re jusy looking at the mechanical construction and contact design.

The Two Contenders

  • AmazonBasics microSD → SD adapter
  • SanDisk Ultra microSD → SD adapter

Two card adaptors - AmazonBasic and SanDisk

  • Both do exactly the same job.
  • Both are widely used.
  • Both look almost identical from the outside.

But internally? Surprisingly different.

Internal Construction Overview

The AmazonBasics adapter was already open from the previous repair video, so we’ll use that as our baseline.

Inside the AmazonBasics Adaptor

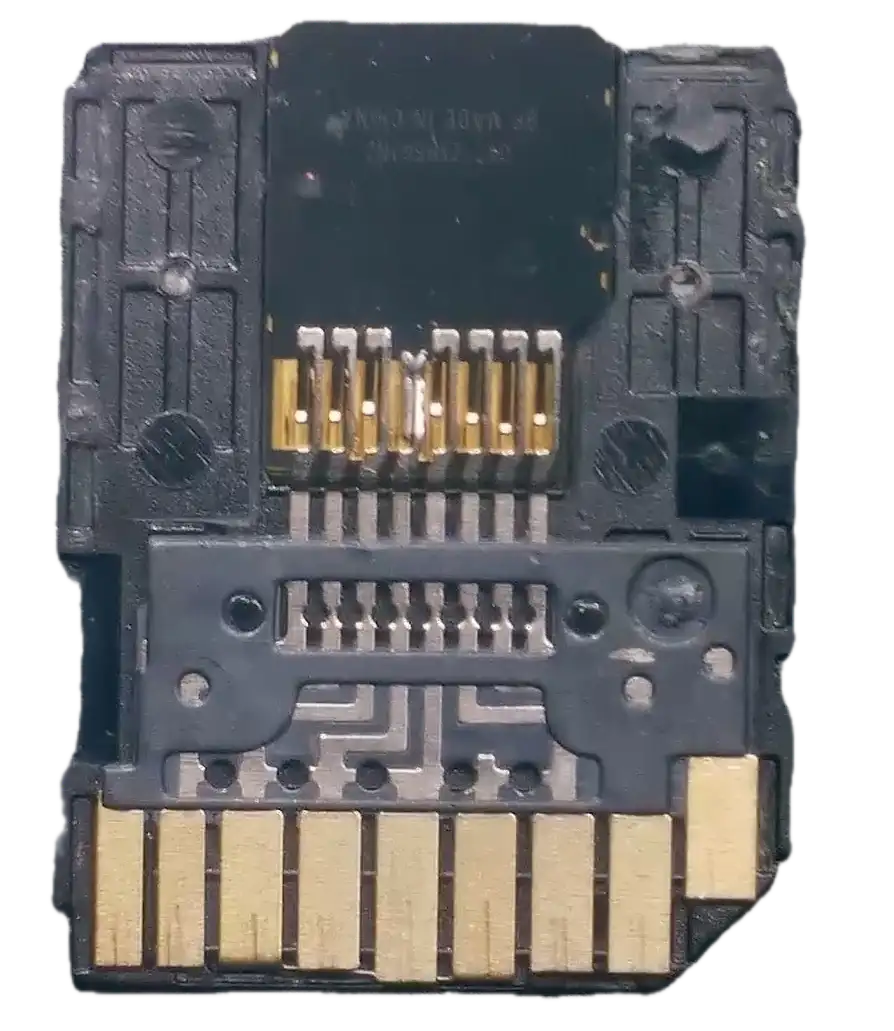
The part we’re most interested in is the spring contacts - that’s the part that failed in the previous repair video.

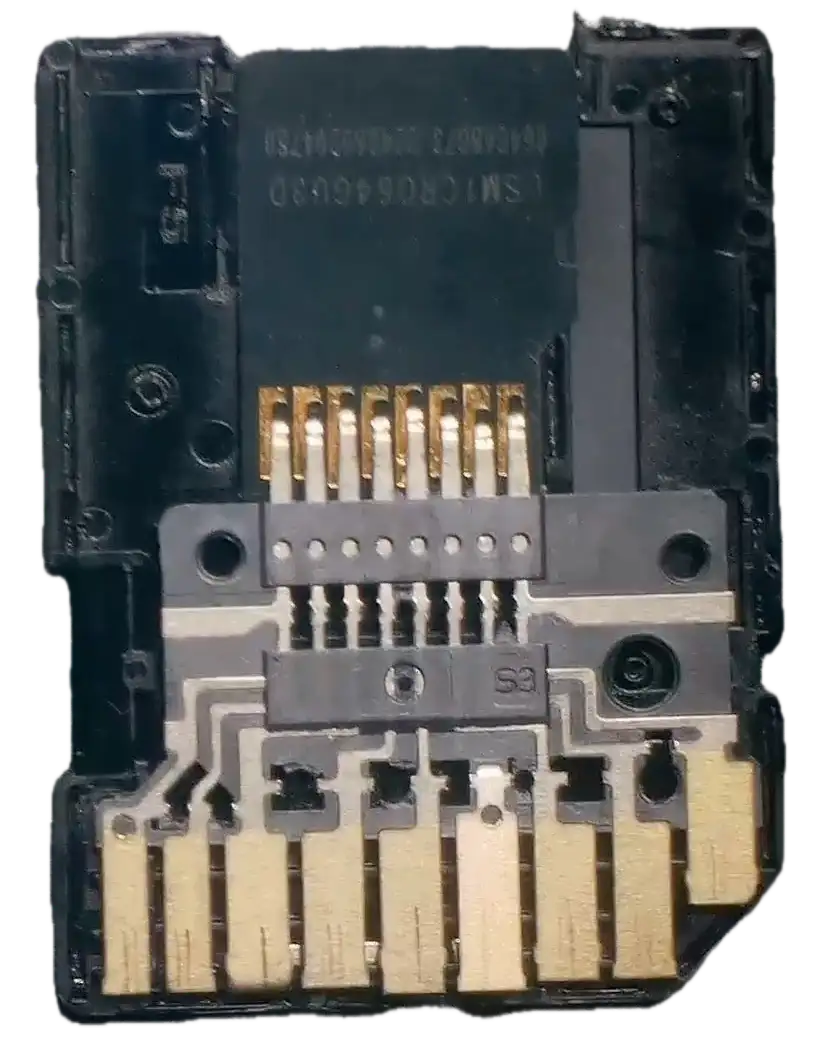
Now let’s crack open the SanDisk.

Inside the SanDisk Adaptor

How do the contacts work in the two adaptors

This is where things get interesting.

Close-up of the spring contacts

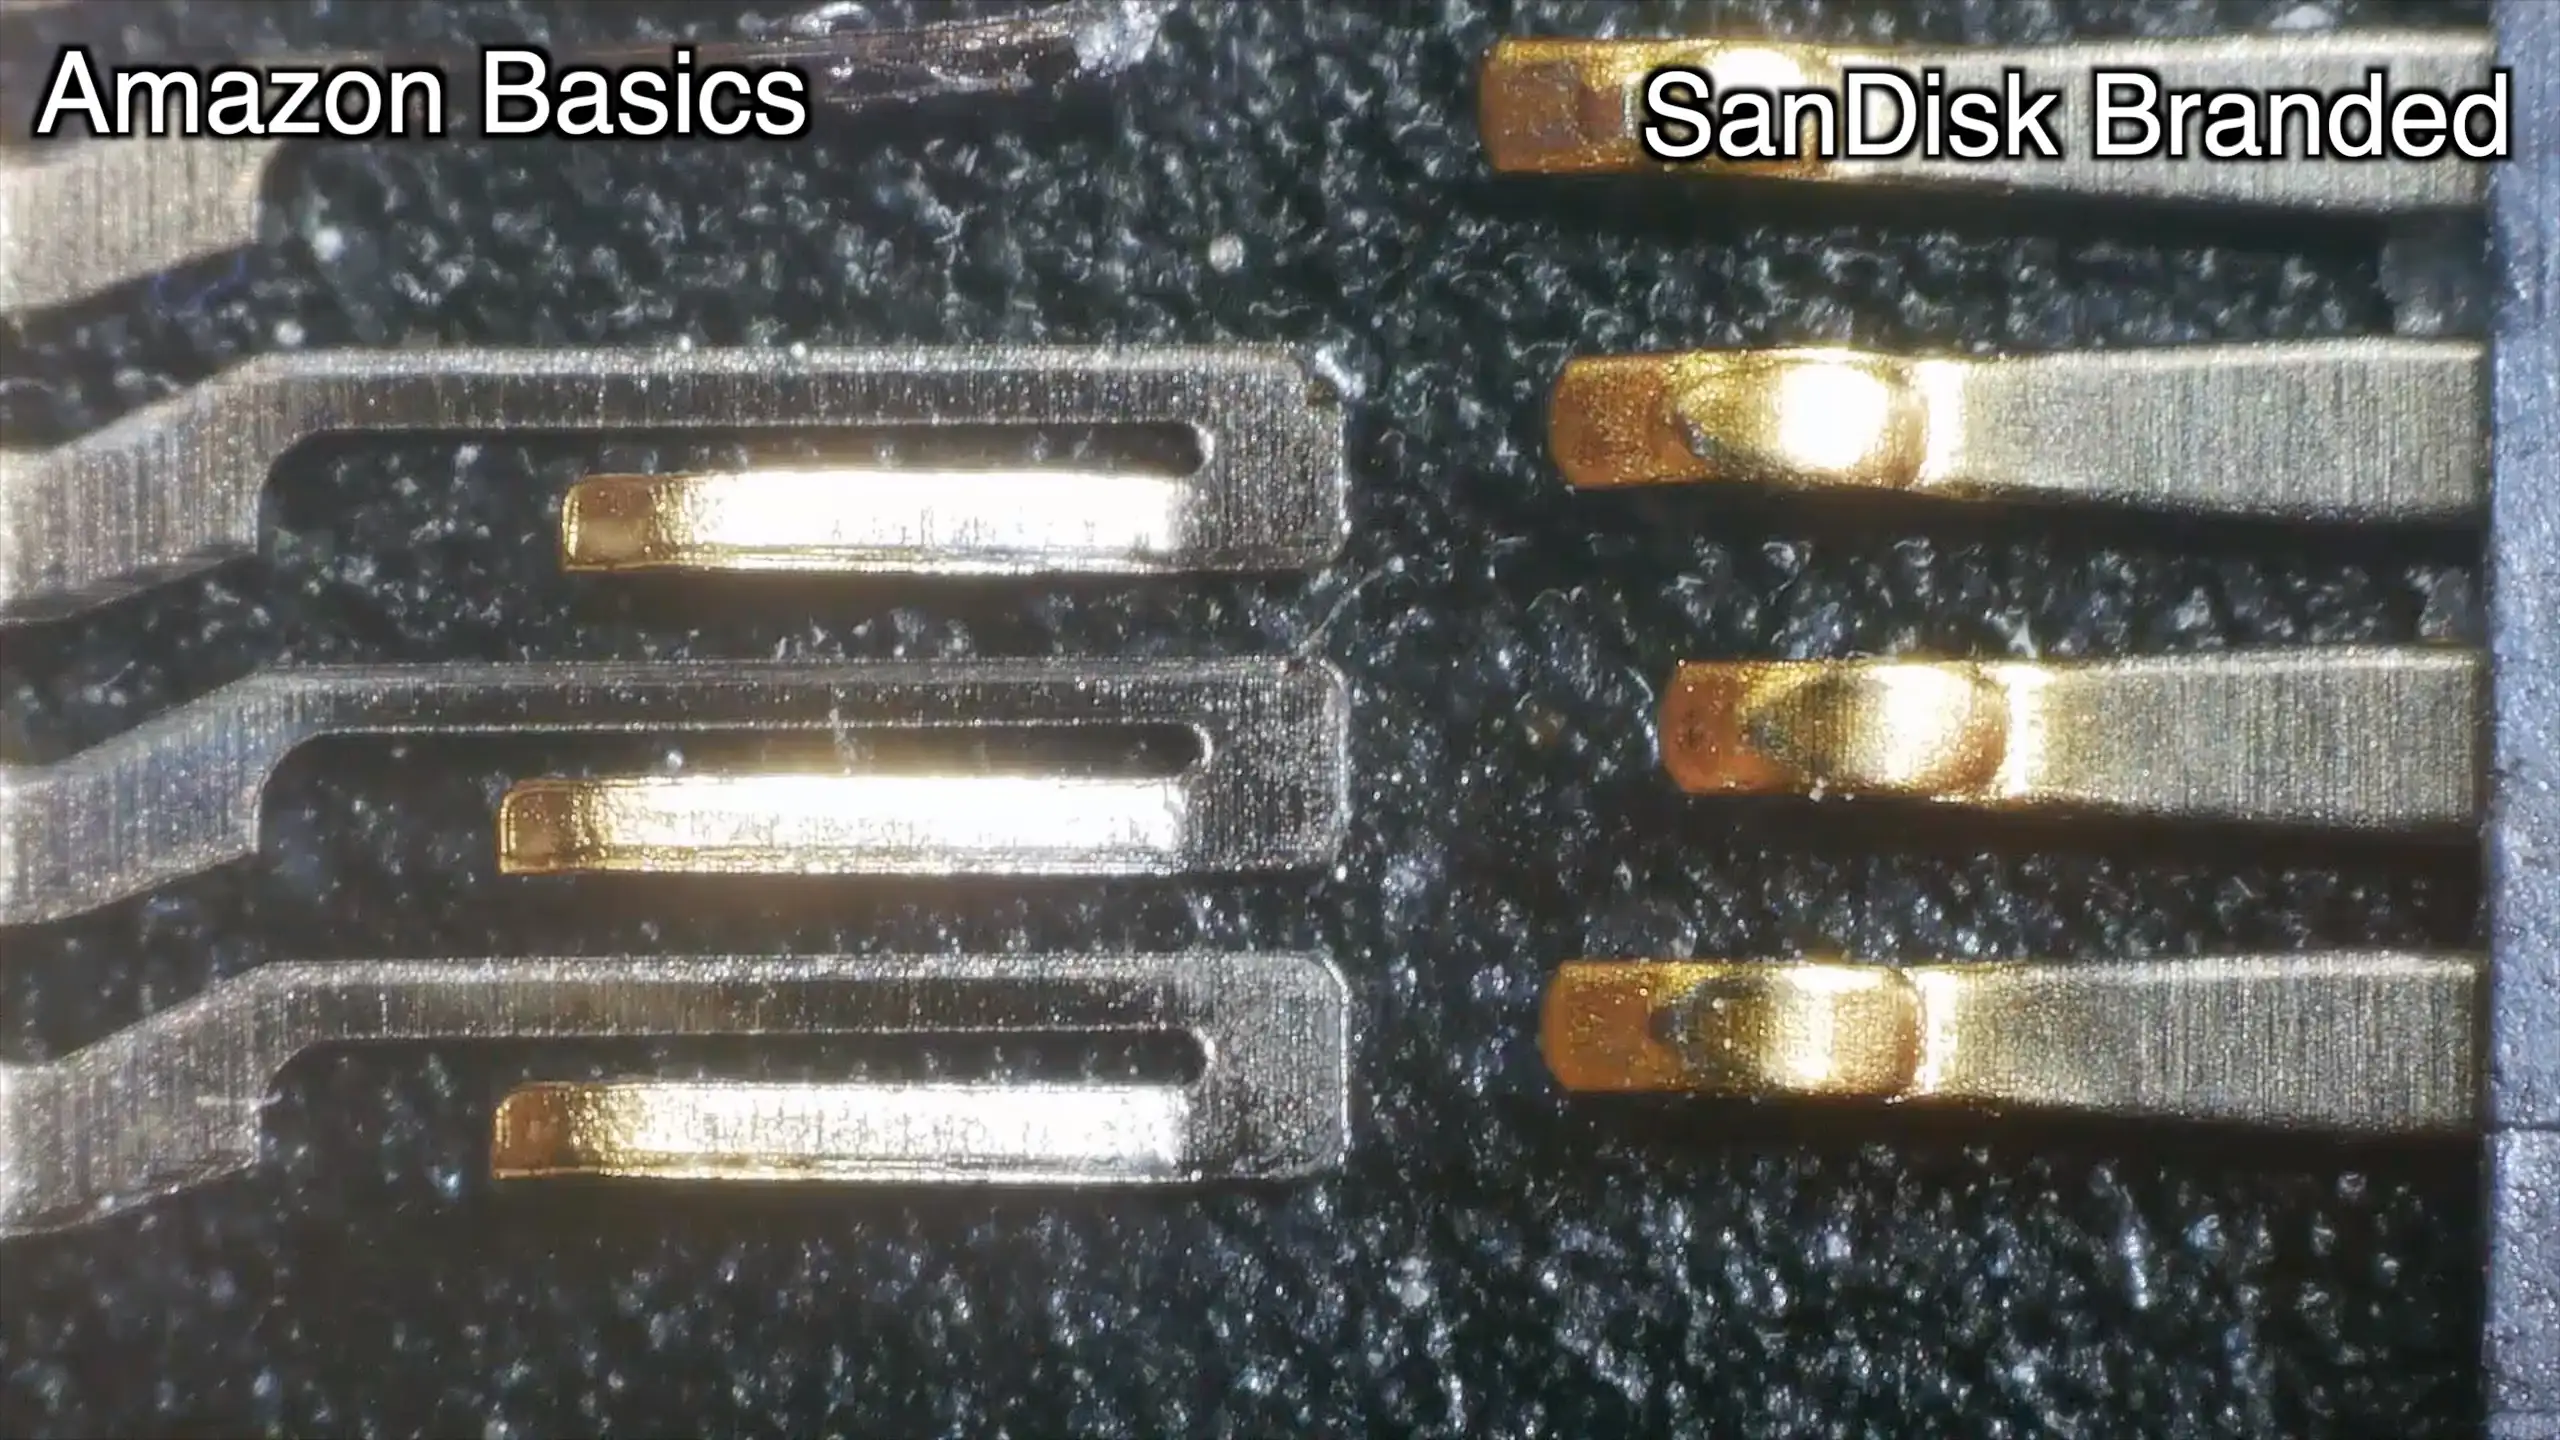
On the left we have the AmazonBasics metal fingers and on the right we have the SanDisc contacts.

You can also see the failure point and solder from my bodge/fix. To me, the AmazonBasic contacts look likely to fatigue and fail if they are repeatedly stressed.

The SanDisk contacts look to be more solid and less prone to failure.

Gold Plating (Or Not?)

I think (though it is hard to tell under the lighting) that the SanDisk contacts appear to have more gold plating than the AmazonBasics ones - I’m not even sure the AmazonBasic contacts have any gold plating.

Having said that - I don’t want to leap to any judgement here:

  • It’s difficult to be certain without destructive testing
  • Reflections and microscope lighting can be misleading
  • Any plating present on either is likely very thin

Still, visually, the SanDisk contacts look a little more premium.

Really Close Up

So… Which Is “Better”?

That’s the tricky bit.

  • Electrically, both do the job.
  • Mechanically, they’re very different.

If you:

  • Insert a card once and leave it there → both are probably fine
  • Constantly swap cards → the SanDisk design might hold up better long-term

The AmazonBasics adapter clearly works — until repeated flexing eventually takes its toll.

My Take

Personally, I slightly prefer the SanDisk design.

It just looks and feels more mechanically robust.

Video Walkthrough

If you’d like to see the teardown, comparisons, and microscope footage in real time, the full video is embedded below.

#AMAZONBASICS #CONSTRUCTION #CONTACTS #DURABILITY #GOLD PLATING #HARDWARE #MICROSD ADAPTER #REPAIR #SANDISK #TEARDOWN

Related Posts

I Bodged a microSD Adapter Back to Life - A cheap microSD adapter died with a horrible scratchy noise, so instead of binning it I cracked it open, found a snapped spring contact, and soldered on a resistor lead as a makeshift tip. Against all odds, it worked and the card mounted—proof these things are just spring contacts—but it’s mechanically cursed and absolutely not to be trusted. Fun experiment, not advice.

Related Videos

Why did I fix this? - Quick little teardown and bodge-fix: my scratchy-sounding SD card adapter had a wonky contact pin. I cracked it open, tried to bend it back, promptly snapped it, then lost the bit. So I chopped a resistor leg, soldered it in under the microscope, tweaked the pins for continuity, and slapped it back together. Plugged it in—holy crap, it worked! Not the prettiest fix, and I probably won’t trust it long-term, but that was fun.
ESP32 SD Card Speedup With a Couple of Lines of Code - In this video, we explore the disappointingly slow data writing speed of the ESP32 when reading and writing to an SD card in our TinyTV project. With 500 kilobytes/sec reading and a dismal 270 kilobytes/sec writing, we embark on an adventure to find a solution. After ditching the Arduino code in favor of IDF functions, we discover incredible improvements. Seeing potential risks, I propose a truly bonkers plan: using a IC to interface SD cards with USB with a USB multiplexer switch and another switch to alternate between ESP32 and the GL823. This could be a total disaster, but I'm game for the challenge. Stay tuned to see if it works out!
Can You Spot the Problem? - Buckle up folks, this video is a thrilling one! There's everything from unboxing my new ESP32 TV boards that arrived from PCB Way to discovering some hidden issues. We're talking about some pesky problems, surprises, and even a potential catastrophic error that could've led to a disaster. The main dish is the high-speed SD card access over USB - ultimately achieving a whooping transfer rate! But, the journey is a roller-coaster ride, from the project completely failing initially, to some smart hacks and triumphant moments. All the peripherals worked well, from the display to the sound amplifier and even the infrared receiver. Despite the ups and downs, there's a lot to learn and that's what makes this video exciting! Can't wait to share the improvements I have in mind for turning the prototype into the ultimate all-in-one device. But first, let's address the elephant in the room - an ill-placed diode that's a ticking bomb, because you know, safety first!
How Good Are My USB Cables? - In this video, I engage in a deeper exploration of USB testing, encountering a range of trials and tribulations along the way. First up, I attempt to test a couple of USB cables and discuss their data lines' peculiar situatedness. Then, I delve into the assembly of the PCB boards, sourced from PCBWay, which surely turned into a learning voyage than an easy sail. The first version faced challenges of misordered large-frame stencil, unseen connection problems, and even DRC errors in the submission process. Not dwell on that, I redesign and bring to table Version 2, complete with USB connectors with broken-out pins and designed for visual inspection ease. Although this version demonstrated success, soldering difficulties and bad connections persisted. Considering all the hurdles, I decide to let PCBWay handle the assembly for the next version. For future strategies, adding test points and eliminating the lithium-ion charging circuit seemed more practically viable. Peeping into version 3, testing points for all USB cable pins have been added and even an option to break out actual USB connections, all towards ensuring an improved error checking and usefulness of the assembly.
#shorts - 20,000mAh? https://youtu.be/PEHDVoAE8sE - Discover the real efficiency of power banks by measuring the amp hours and Watt hours of two 10,000mAh batteries in this intriguing experiment.
HELP SUPPORT MY WORK: If you're feeling flush then please stop by Patreon Or you can make a one off donation via ko-fi
Want to keep up to date with the latest posts and videos? Subscribe to the newsletter
Blog Logo

Chris Greening


Published

> Image

atomic14

A collection of slightly mad projects, instructive/educational videos, and generally interesting stuff. Building projects around the Arduino and ESP32 platforms - we'll be exploring AI, Computer Vision, Audio, 3D Printing - it may get a bit eclectic...

View All Posts