🌈 ESP32-S3 Rainbow: ZX Spectrum Emulator Board! Get it on Crowd Supply →
View All Posts
read
Want to keep up to date with the latest posts and videos? Subscribe to the newsletter
HELP SUPPORT MY WORK: If you're feeling flush then please stop by Patreon Or you can make a one off donation via ko-fi
#BODGE #DATA STORAGE #DIY #ELECTRONICS REPAIR #FIX #HARDWARE HACKING #MICROSD #REVERSE ENGINEERING #SD CARD ADAPTER #SOLDERING #SPRING CONTACTS #TEARDOWN

Sometimes the correct engineering decision is to throw something away. This was not one of those times.

I’ve got an embarrassing number of microSD card adapters. They’re cheap, they come free with cards, and they tend to pile up in drawers.

So when one of them stopped working, the sensible thing would have been to bin it and grab another.

Instead, I wondered:

Can this be fixed at all? And more importantly — how do these things actually work inside?

This post accompanies the video below, where I crack open a broken microSD adapter, make things worse, and then accidentally bring it back to life.

đŸ“ș The Video

I Bodged a microSD Adapter Back to Life

The Problem: A Very Unhealthy Noise

The adapter didn’t just fail quietly — it made a horrible scratchy sound when inserting a card, and it wasn’t detected by the computer at all.

That sound turned out to be the biggest clue.

With a torch and a microscope, it was possible to look inside the end of the adapter and compare it with a known-good one.

Something was clearly out of place.

This is not right

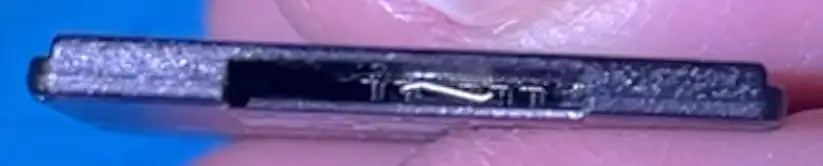
One of the spring contacts had bent sideways instead of sitting neatly at the end of the slot.

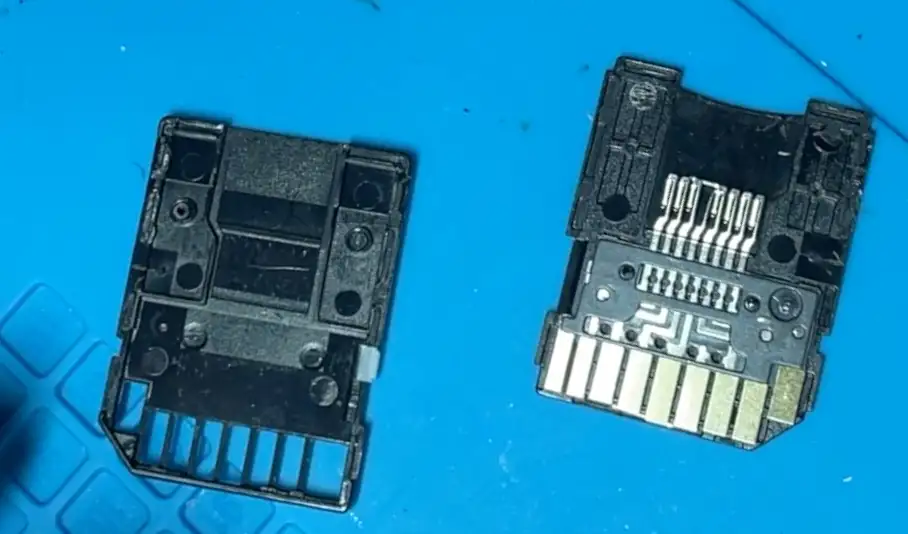
Cracking It Open (Irreversibly)

There are no screws. These adapters are glued together.

With a bit of persuasion (and a worrying crack), the case finally came apart — and the problem was immediately obvious.

One of the tiny spring contacts had been bent, and part of it had actually snapped off.

At this point, the adapter was definitely worse than when I started.

Inside the adaptor

How microSD Adapters Actually Work

Inside, the adapter is beautifully simple:

  • Each microSD pad connects to a spring contact
  • The spring presses against the card when inserted
  • The pressure ensures reliable electrical contact

Close up

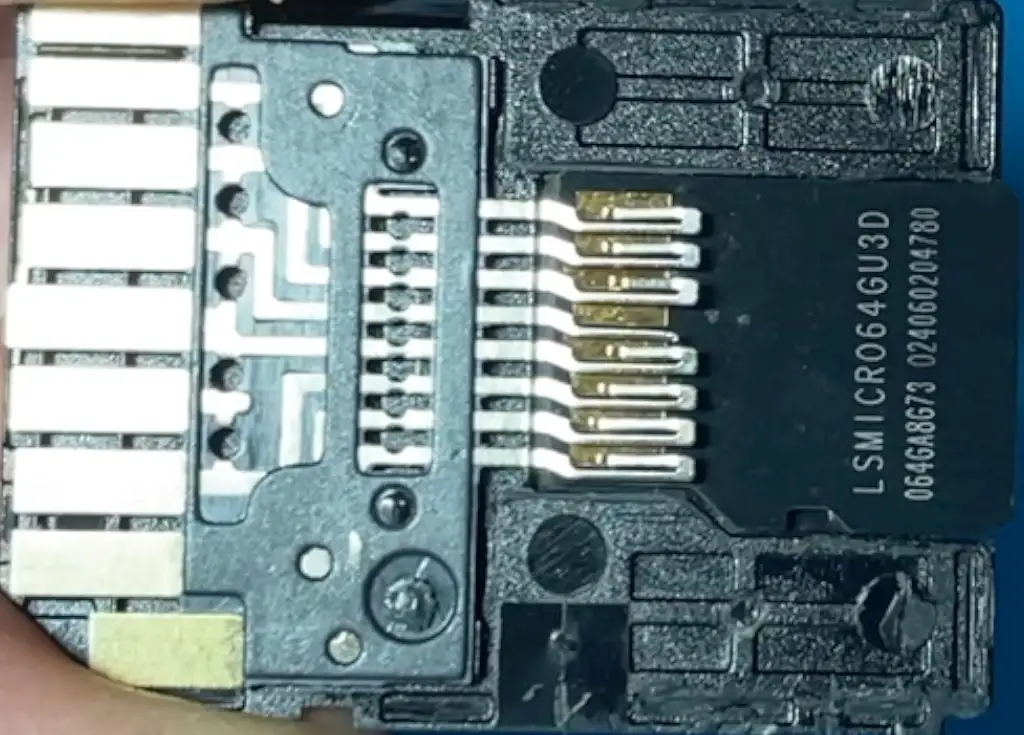
Lose the tip of that spring, and there’s nothing left to touch the card.

Which brings us to the bodge.

The Bodgeℱ

Since the original contact tip was gone forever (lost to the workshop floor), the only remaining option was
 creativity.

I chopped the lead off a resistor and soldered it onto what was left of the spring contact.

This is absolutely not how this part was designed to work.

This is horrible

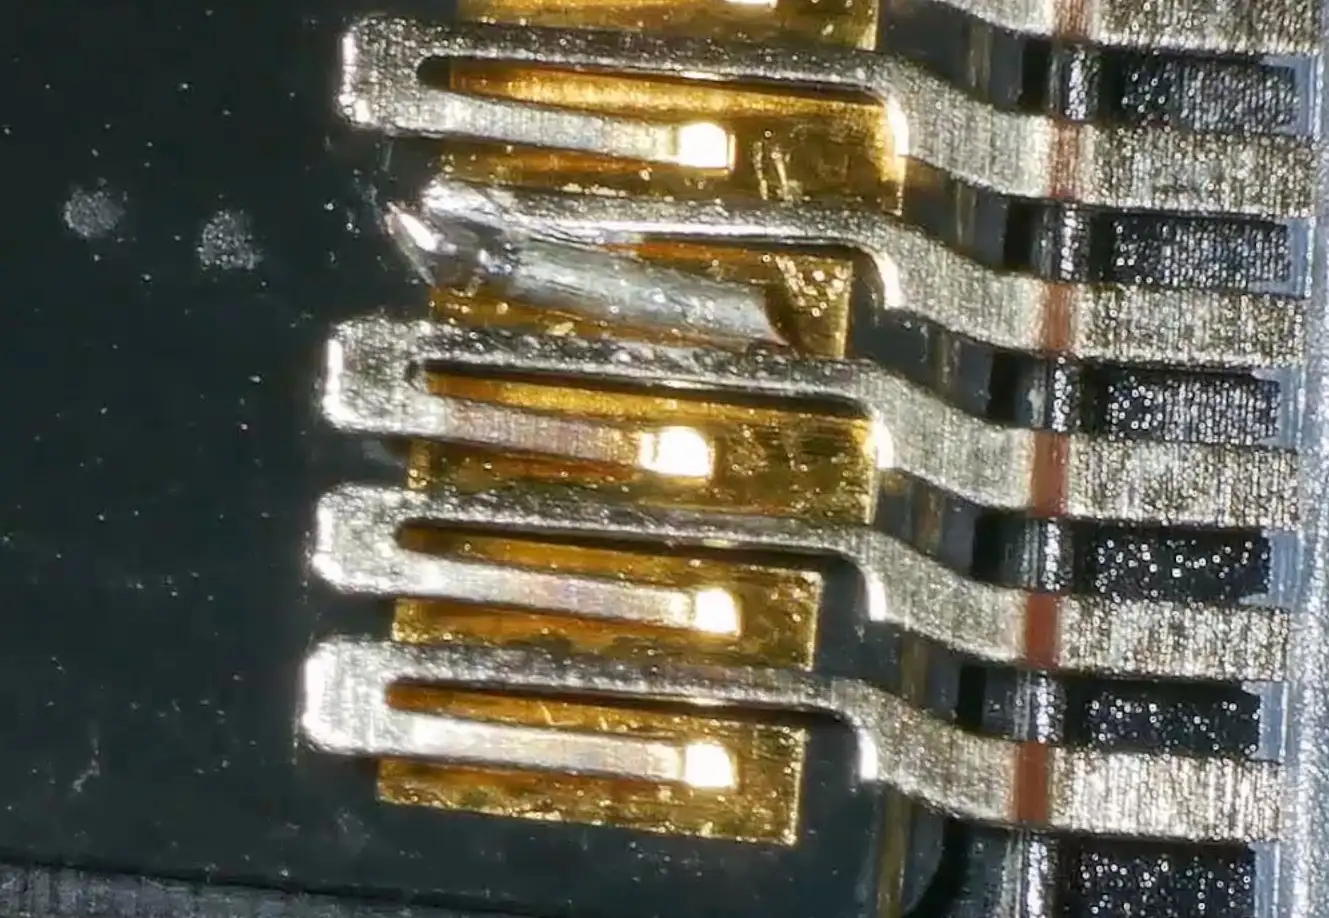
But with some careful bending, it might just make contact with the SD card again.

Continuity checks said it was connected.

No shorts between pins.

Time to test it.

Shockingly
 It Worked

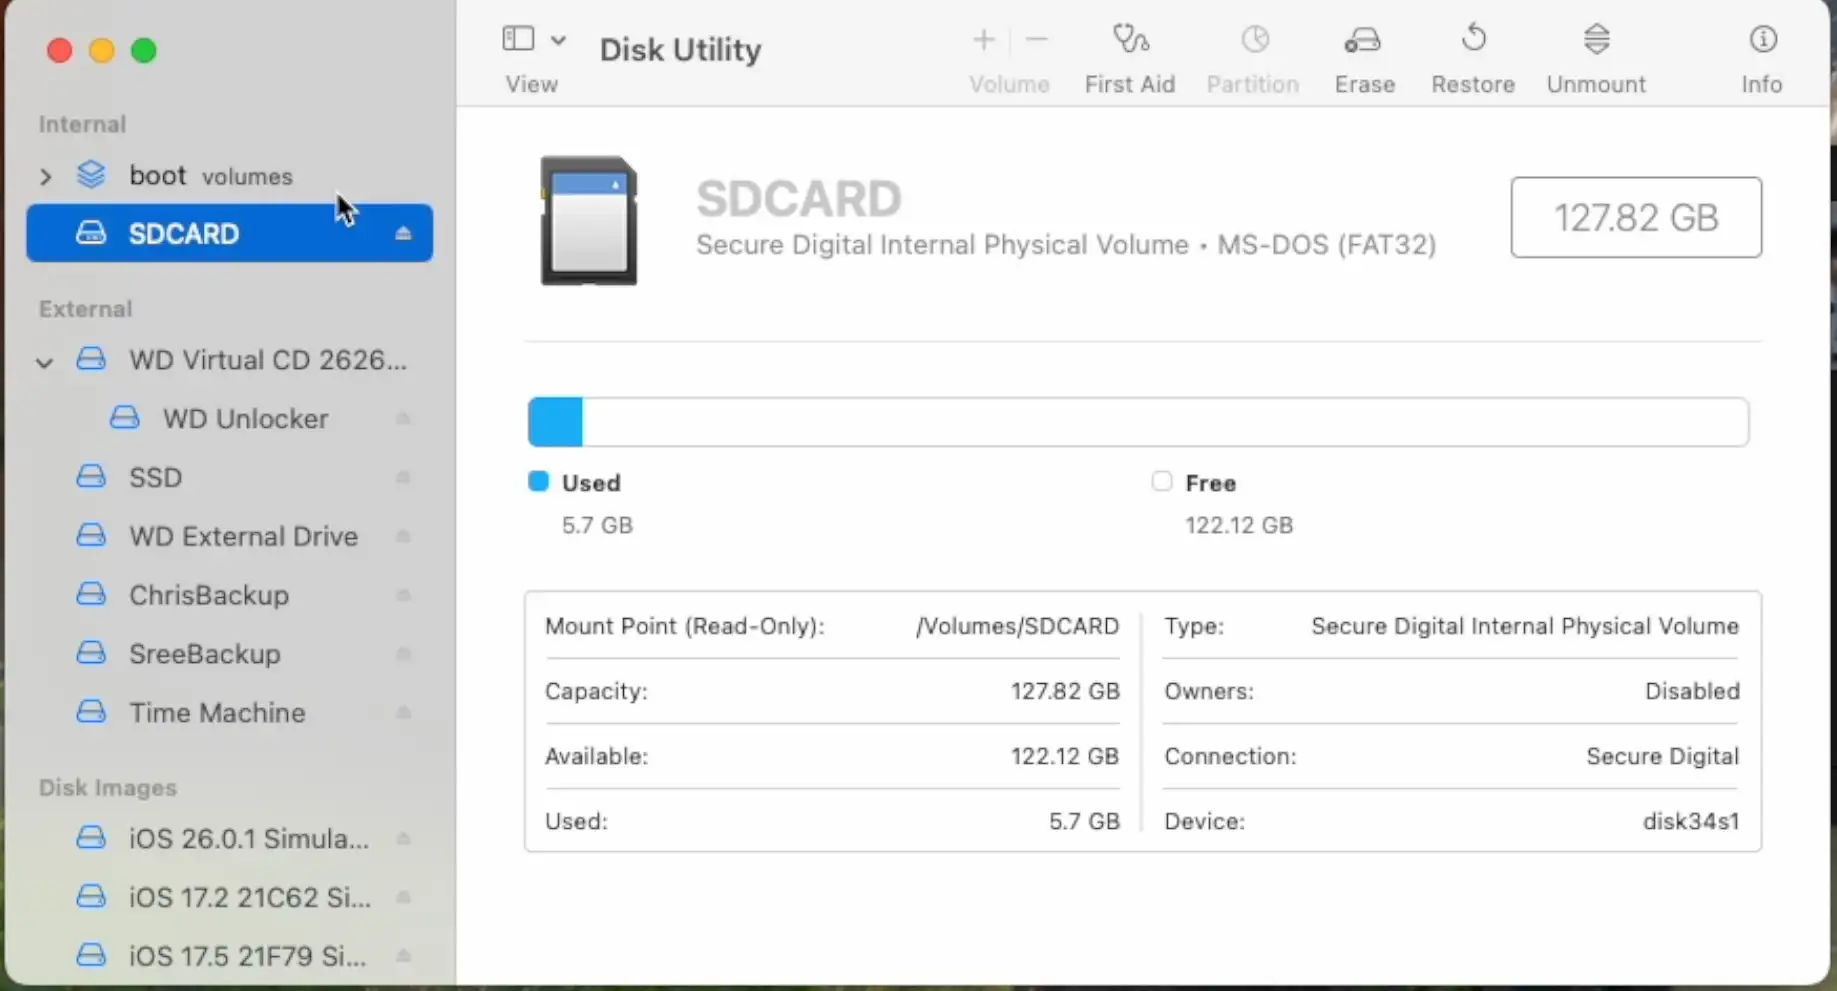
Plugged into the computer, the SD card appeared instantly.

Even Final Cut popped up asking if I wanted to import media.

Formatting, reading, writing — all working.

SDCard Mounted

I was genuinely surprised.

Should You Do This?

No.

Absolutely not.

This adapter:

  • Is mechanically compromised
  • No longer clips together properly
  • Contains a hand-soldered bit of resistor lead pretending to be a precision spring contact

I won’t be trusting it with anything important.

But as an experiment?

It was definitely interesting.

#BODGE #DATA STORAGE #DIY #ELECTRONICS REPAIR #FIX #HARDWARE HACKING #MICROSD #REVERSE ENGINEERING #SD CARD ADAPTER #SOLDERING #SPRING CONTACTS #TEARDOWN

Related Posts

I broke it and then i fixed it - Started off on a techie adventure with an RP2040 DVI board from Adafruit, aiming to get the pico-zxspectrum going. Things started acting haywire once the USB hub got involved, ending in a complete shutdown, intuitive diagnosis showed the power pin was a ghost town! After pin-pointing (and removing) the dead IC, I performed a delicate soldering operation to bless it with a new 3V3 regulator. Working the kinks out with the resolution led to a thrilling revival and, voila, we were back in business with DVI output and SD Card support!
When “Software Bugs” Are Actually Bad Soldering - A quick MLX90640 IR camera test turned into a dead-on-I2C mystery. I ran the usual checks—addresses, pull-ups, voltages, wiring—and even fixed my forgotten UART/I2C jumper, but still nothing. A peek under the microscope revealed sketchy solder on the 3V3 LDO; a quick reflow and the sensor sprang to life. Lesson relearned: don’t trust factory soldering, look early with a microscope, and stop blaming software when the hardware’s silent.
It blew itself up! - I recently got my hands on a cheap mini handheld game console from AliExpress that gave up the ghost a bit sooner than expected! After some detective work with a multimeter, I found a dead battery and a suspicious burn mark on the PCB. Looks like the culprit was a failed capacitor, with some diodes to blame too. I managed to jump-start the board, though it lost its voice in the process. Replacement parts are on the way; stay tuned for the next round of electronic surgery!
Red Arcade Thing Repair - I resurrected a dead AliExpress arcade handheld by swapping the blown 3.3V regulator (I now own 99 spares), adding a TP4056 charger with Schottky diode isolation, and nursing a 0V LiPo back to life. A bit of hot-plate rework, tidier wiring, and—flip the switch—boom: it boots! It’s not pretty, but it’s alive again.
Making hard pcbs at home - In my latest DIY adventure, I explored nickel plating to harden PCBs at home. I was inspired by a slick resistor box design I found through EEVBlog, which had an incredibly cool switching technique but left the PCBs vulnerable to wear from contact scraping. Despite some initial mix-ups and challenges—like dealing with steel instead of pure nickel, using the wrong voltage, and dealing with contamination—my experiments led to some promising results. I even compared the scratch resistance of plated vs. original PCBs in a very informal test. I wrapped up by sharing some handy links for anyone eager to dive into their own nickel plating escapades. It's clear that more experiments are on the horizon!

Related Videos

I Bodged a microSD Adapter Back to Life - Quick little teardown and bodge-fix: my scratchy-sounding SD card adapter had a wonky contact pin. I cracked it open, tried to bend it back, promptly snapped it, then lost the bit. So I chopped a resistor leg, soldered it in under the microscope, tweaked the pins for continuity, and slapped it back together. Plugged it in—holy crap, it worked! Not the prettiest fix, and I probably won’t trust it long-term, but that was fun.
Dodgy circuit could have caused a fire! - So, I got this red mini handheld game thing from AliExpress and it died pretty quickly. After a bit of tinkering, I found that it still draws current but isn't turning on because of a dead battery and a burnt voltage regulator. I removed the faulty components and injected 3.3 volts directly into the system, and guess what? The screen lights up and it works, but there's no sound. Despite the hiccup with my microscope, which stopped recording some interesting bits, you get the picture. It's partly revived but not quite there yet. Big shout out to PCB way who help us out with PCBs!
10Âą MCU Brain Surgery - CH32V003 - I crack open a punchy little toy, show how the original just squishes two contacts to light the eye LEDs off a pair of LR41s, then perform some brain surgery to cram in a tiny lithium cell and my own board that triggers lights—and an incredibly annoying tune—on each punch. It sips about 7 ”A in deep sleep and wakes via a yellow trigger wire, but the soldering was fiddly and full of swearing. Tape it up, cram it back in the head, and yes, it works a treat
 maybe too well, because the beeping is driving me mad.
I Spent Hours Debugging My Software
 - Quick bench update: I tried to get a 32×24 pixel IR module talking over I2C and it just would not play ball—pull-ups, library swaps, address scans, nothing. First silly mistake was not bridging the I2C jumper. Even after fixing that, still dead. Under the microscope I spotted the real issue: poorly soldered pins on the IC. A quick reflow and some IPA cleanup later, it sprang to life. Moral of the story: if yours won’t talk, check the underside soldering. Project video coming soon.
PCB Mistake Turns into Vacuum Stencil Experiment | MHP30 Hotplate Test - Learn how to recover from a mistaken chip order and improve SMD soldering techniques using a mini hotplate and vacuum cleaner stencil holder. Watch the mesmerizing results under the microscope!
HELP SUPPORT MY WORK: If you're feeling flush then please stop by Patreon Or you can make a one off donation via ko-fi
Want to keep up to date with the latest posts and videos? Subscribe to the newsletter
Blog Logo

Chris Greening


Published

> Image

atomic14

A collection of slightly mad projects, instructive/educational videos, and generally interesting stuff. Building projects around the Arduino and ESP32 platforms - we'll be exploring AI, Computer Vision, Audio, 3D Printing - it may get a bit eclectic...

View All Posts