I’ve been working on my version of the TinyTV for a while now. It’s all based around the ESP32 a popular and powerful WiFi enabled microcontroller.
For the first version I did the streaming from a simple Python server running on my desktop and used the WiFi capabilities of the module. I chose to do this first as in my mind it was the simplest thing.
Our server just needed three endpoints, one to get audio data, another to get a frame of video data, and finally an endpoint to get meta data about the available videos.

There are a couple of options for presenting the video frames - we could send completely uncompressed image data that would be ready to display directly on the screen. The screen I’m using is 280x240 pixels and each pixel is RGB565 - that’s 5 bits for red, 6 for green and 5 for blue.
This would give us a total size of 131.25KB per frame. At any reasonable frame rate this would swamp the WiFi interface and we’d spend all our time just transferring data.
A much more popular choice for this kind of thing is individual JPEG frames - which is what MJPEG or Motion JPEG is based around.
With the right library (I’m using JPEGDEC) an ESP32 can decode and display a 280x240 JPEG image in about 36ms - which gives us a theoretical frame rate of about 28 frames per second.
To make things really efficient we can use the dual cores of the ESP32 and have two threads - one downloading frames from the server and another decoding and displaying the last frame.
For the audio side of things we can keep things simple and just serve up 8bit 16KHz PCM data. Audio takes up a lot less bandwidth than video so we don’t really need to worry about this - if we wanted to get clever then the ESP32 is capable of processing MP3 data - but that would take up processing power that we need to decoding JPEG files.
The only challenge that we have is keeping the audio and video in sync. There’s nothing more annoying when you’re watching a show and the audio is out of sync with the video.
The approach I’ve taken is to use the audio samples as the time basis. I can then just request frames that match the current audio timestamp. We may skip a few frames every now and then, but we’ll stay matched up to the audio that’s being played.
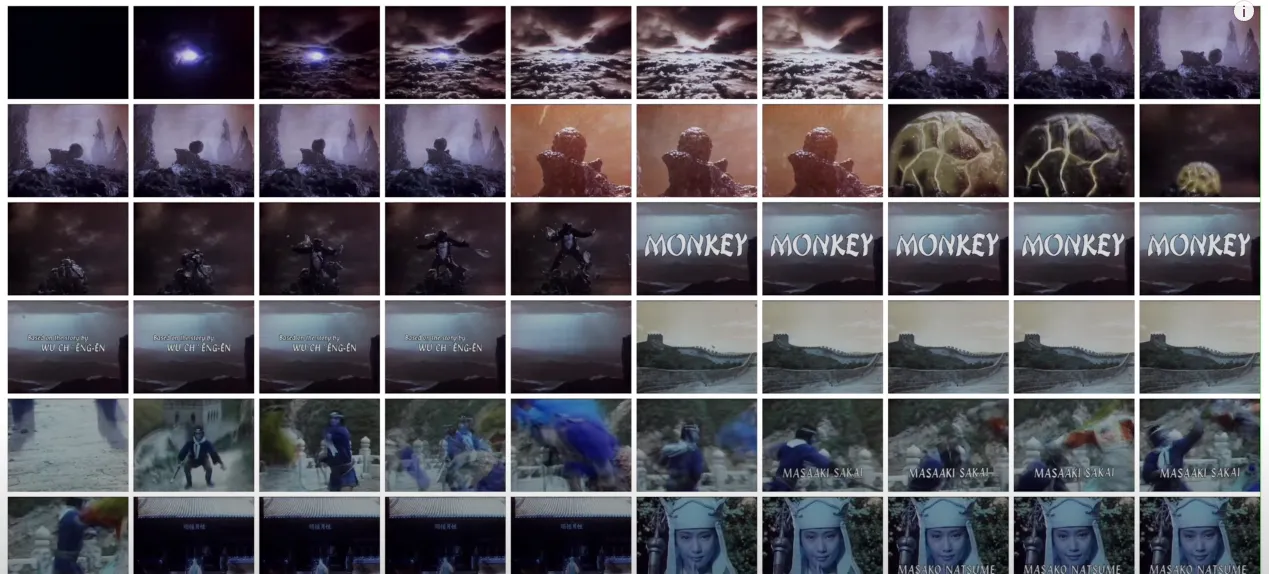
This works really well and you can see it all working in this video:
The server is really nice and simple as well, it doesn’t need to do any clever video encoding or variable bitrate matching with the client, it just needs to extract the requested block of audio samples and a frame at the requested timestamp.
What About Locally Stored Videos
Streaming over WiFi is nice, but it’s not exactly convenient and ultimately it would be nice to have a portable battery powered video player. I’ve also got lots of issues with my home WiFi network that make it perform really badly. Ideally we want to be able to stream video from an SD Card connected to our ESP32.
It’s surprisingly easy to connect an SD Card to an ESP32 - SD Cards support SPI and the ESP32 has built in support for this (it’s actually how it talks to the display I’m using).
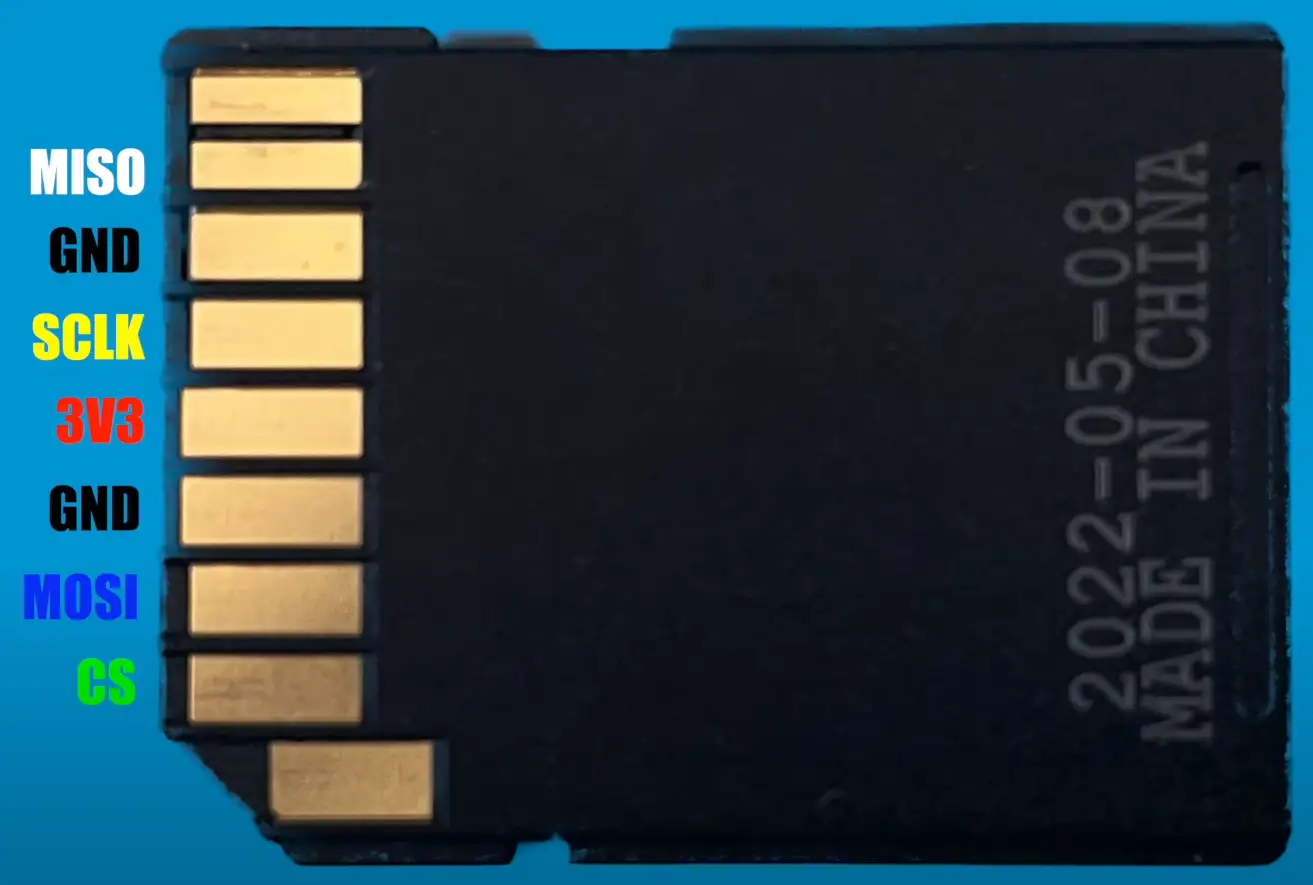
As you can see from my increasingly Heath Robinson setup you can just connect directly from the SD Card pins to the ESP32.
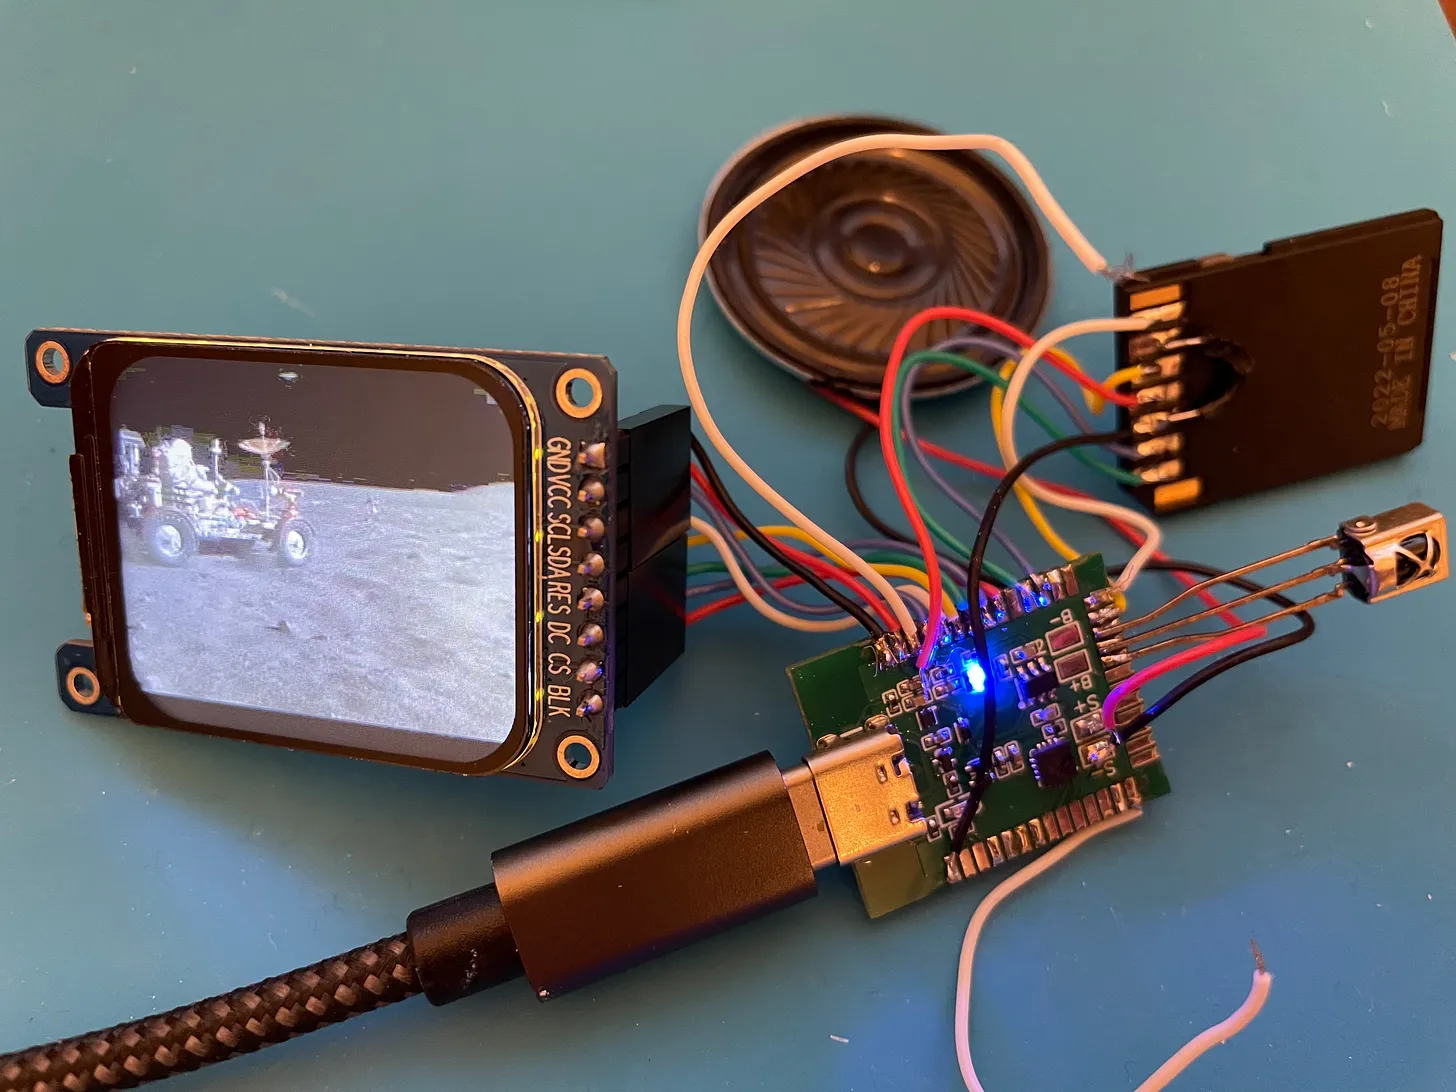
So storage is pretty easily - and we can connect pretty large SD Cards easily so big files are not really problem.
Our real problem is what format should we store our video files in. And the issue is that most media container formats are completely bonkers. The spec for MP4 files runs to over 80 pages - there’s no way that I want to try and implement that on an ESP32.
So I consulted with an “expert” (cough ChatGPT…) to see what my options were and it had a couple of pretty interesting suggestions:
- Export two separate files from the movie file
- One containing MJPEG data - so basically a bunch of JPEG files concatenated together
- Another containing the 8 bit PCM audio data
- Create a simple custom format with simple header structures followed by blocks of either JPEG or audio data.
The first option is very tempting the two files can be generated by simple ffmpeg commands:
ffmpeg -i input.mp4 -c:v mjpeg -q:v 3 output.mjpg
ffmpeg -i input.mp4 -vn -c:a pcm_u8 -ar 16000 -f u8 output.raw
The second option is little more convenient as it would only generate one file making things easier to manage, but it would involve writing some custom code to create the video format - potentially doable, but life is way to short for that kind of thing.
However, the biggest issue with both these formats is that you wouldn’t be able to easily play the files on your desktop computer. So it’s not very convenient.
So after a bit more back and forth we came to the conclusion that the AVI file format might be a suitable option.
AVI files are relatively straight forward - provided you make a bunch of assumptions and ignore a lot of the meta data.
The basic structure looks like this:
RIFF "AVI " (space at end)
    LIST "hdrl"
    DATA "avih", len: 56
        LIST "strl"
            DATA "strh", len: 56
            DATA "strf"
        LIST "strl"
            ...
    LIST: name: `INFO' (optional)
        ...
    LIST "movi"
        DATA "00dc"
        DATA "01wb"
        ...
    DATA "idx1"
If we look at a hex dump of an AVI file we can see this quite clearly
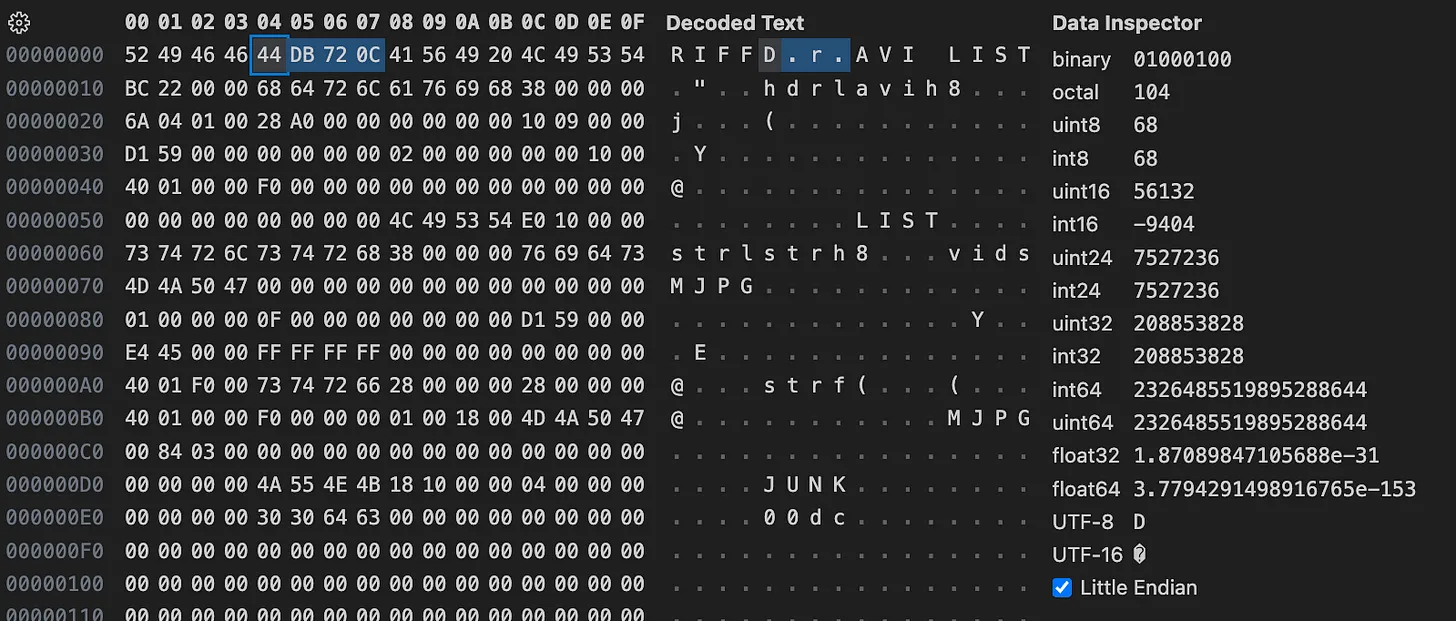
We have four bytes with the values “RIFF” which tell us this is a Resource Interchange File Format. And this followed by four bytes that give us the length of the data (in this case we have 208,853,828 bytes which is the size of our file minus the 8 bytes of the header - 4 bytes for “RIFF” + 4 bytes for the size).
Following this header we have the subtype of the file “AVI “ which tells use this is an AVI file.
This is then followed by chunks of data. Each one prefixed with 4 bytes telling us the chunk type and 4 bytes telling us the length of the chunk data. So we can easily read through the AVI file using the following code:
typedef struct {
    char chunkId[4];
    unsigned int chunkSize;
} ChunkHeader;

void readChunk(FILE *file, ChunkHeader *header) {
    fread(&header->chunkId, 4, 1, file);
    fread(&header->chunkSize, 4, 1, file);
    printf("ChunkId %c%c%c%c, size %u\n",
           header->chunkId[0], header->chunkId[1],
           header->chunkId[2], header->chunkId[3],
           header->chunkSize);
}

int main(int argc, char *argv[]) {
    FILE *file = fopen(argv[1], "rb");
    ChunkHeader header;
    // Read RIFF header
    readChunk(file, &header); // you could check it's "RIFF"
    // next four bytes are the RIFF type which should be 'AVI '
    char riffType[4];
    fread(&riffType, 4, 1, file); // you could check it's "AVI "
    while (!feof(file) && !ferror(file)) {
        readChunk(file, &header);
        if (strncmp(header.chunkId, "LIST", 4) == 0) {
            processListChunk(file, header.chunkSize);
        } else {
            // skip the chunk data bytes
            fseek(file, header.chunkSize, SEEK_CUR);
        }
    }
    fclose(file);
    return 0;
}
I’ve omitted any error handling and checking that the file is present and that it has valid headers. But this code will run through an AVI file printing out each chunk of data it finds along with the length.
We just need to find a “LIST” chunk that has a subtype of “movi” - if we look at the hex dump we can see how to process this:
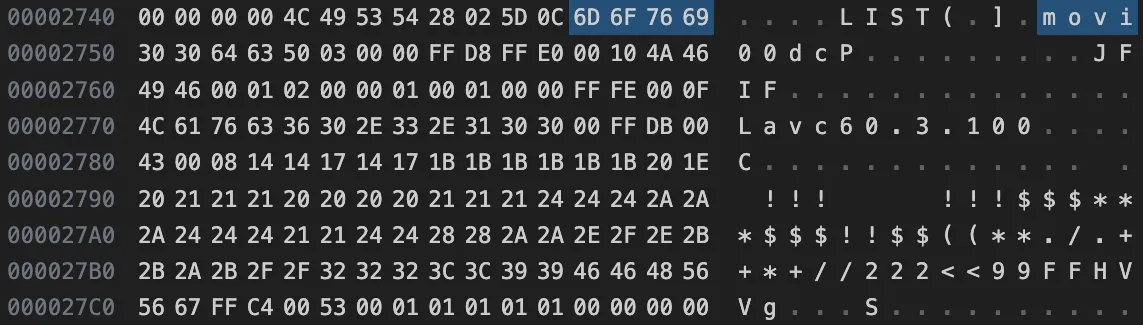
We have the “LIST” chunk type followed by four bytes for the length. And then we have the subtype of the list “movi”. This is where we can find out video and audio data.
The LIST chunk contains child chunks. Video data has the type “00dc” and audio data has the type “01dw”.
And if we look a bit further along we can see the header of a JPEG file. These always start with the bytes FF D8 followed by some additional bytes and then the string “JFIF”.
The only slight trap which I missed is that the chunks of data are always word aligned. But the length does not include any padding. So if you have an odd chunk length you have to skip a byte at the end of reading it.
We can now add our function processListChunk:
void processMovieList(FILE *fp, unsigned int chunkSize) {
    ChunkHeader header;
    while (chunkSize > 0) {
        readChunk(fp, &header);
        if (strncmp(header.chunkId, "00dc", 4) == 0) {
            printf("Found video frame.\n");
        } else if (strncmp(header.chunkId, "01wb", 4) == 0) {
            printf("Found audio data.\n");
        }
        fseek(fp, header.chunkSize, SEEK_CUR);
        chunkSize -= 8 + header.chunkSize;
        // handle any padding bytes
        if (header.chunkSize % 2 != 0) {
            fseek(fp, 1, SEEK_CUR);
            chunkSize--;
        }
    }
}

void processListChunk(FILE *fp, unsigned int chunkSize) {
    char listType[4];
    fread(&listType, 4, 1, fp);
    chunkSize -= 4;
    // check for the movi list
    if (strncmp(listType, "movi", 4) == 0) {
        processMovieList(fp, chunkSize);
    } else {
        fseek(fp, chunkSize, SEEK_CUR);
    }
}
So we can now easily locate our video frames and our audio data. This code is simple enough that it will run nicely on the ESP32.
It also kind of fits in with the current architecture - again we can split the video and audio processing into two separate processes - we just need to open the AVI file twice, once to read the audio data and once to read the video data.
Again we stream the audio data out to speaker and use this to keep track of elapsed time. For the video rendering we make sure we keep in sync with the audio by skipping over video frames as needed.
It works surprisingly well as you can see in this video:
The code is all up on GitHub - some of it is a bit rough and ready, but it should work on pretty much any ESP32 board - you just need to connect a screen and an SD Card - and for that you can use one of the many breakout boards that are available - soldering wires like I have is completely optional!