View All Posts
read
Want to keep up to date with the latest posts and videos? Subscribe to the newsletter
HELP SUPPORT MY WORK: If you're feeling flush then please stop by Patreon Or you can make a one off donation via ko-fi
#DMA #ESP32 #IMAGE DECODING #JPEG #PERFORMANCE OPTIMIZATION #SIMD

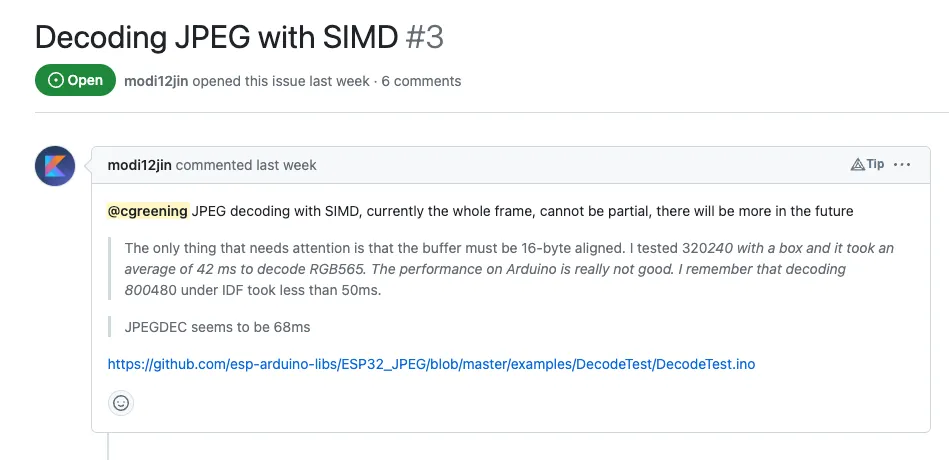
A slightly cryptic issue appeared on the esp32-tv project:

JPEG Issue

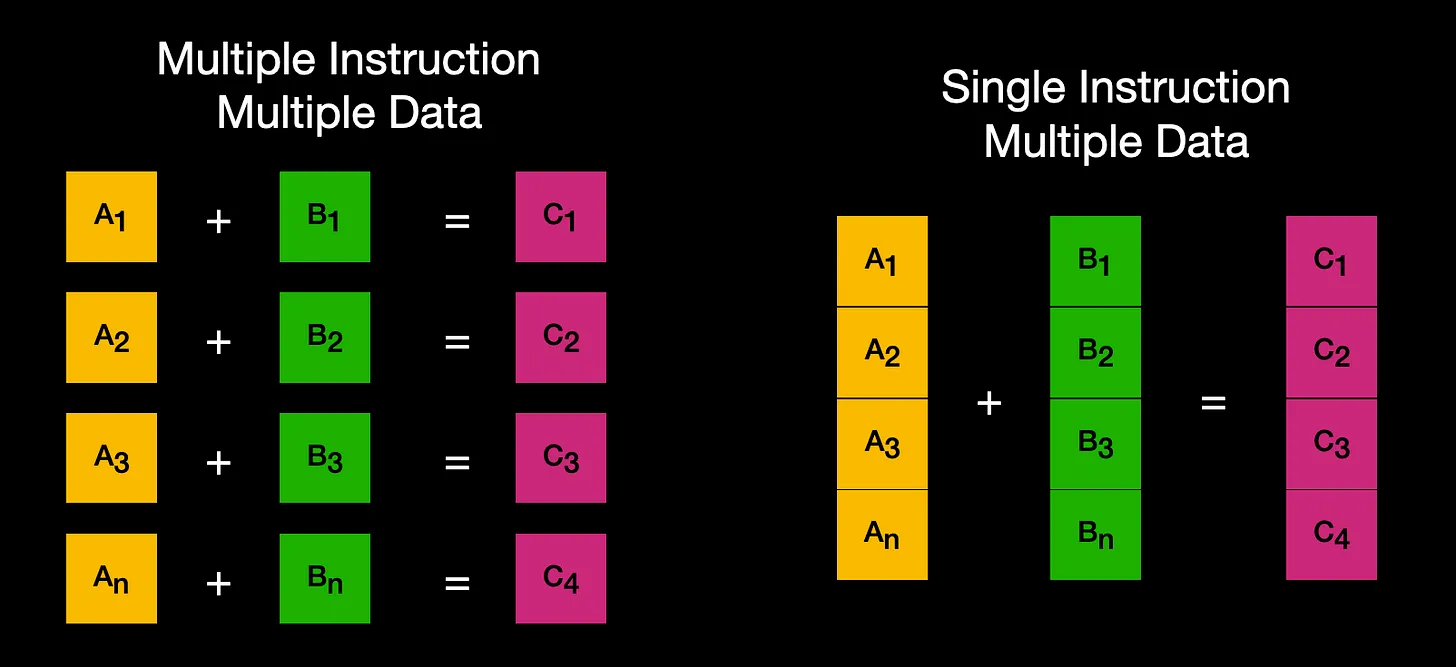
This is pretty interesting - SIMD (Single Instruction Multiple Data) can potentially really speed up decoding of JPEG files.

Normally when executing code you run an instruction that operates on a single piece of data, then you run the next instruction, and the next instruction etc.. we have Multiple Instructions operating on Multiple Data elements.

With SIMD instructions we have one Single Instruction that can then operate on Multiple Data elements.

This can give a significant performance boost.

SIMD

So, just how much fast is the decoding library I was sent? It’s pretty damn fast - 20ms to decode my test image (272x233 pixels) on an ESP32-S3.

Decode Time (272x233 image)

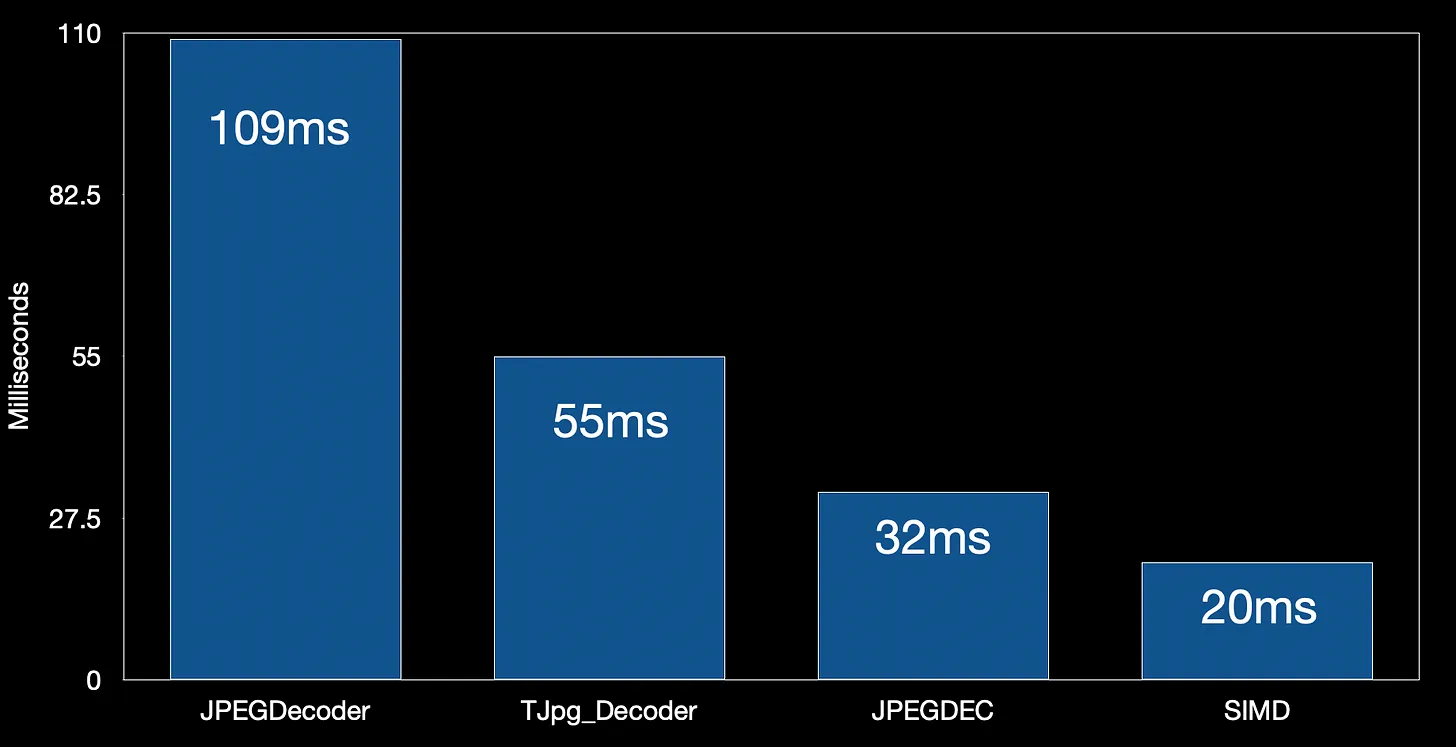
So that’s pretty amazing! But there’s something very interesting when we start to draw the images - and there’s no point decoding images if we don’t display them!

Draw Time (272x233 image)

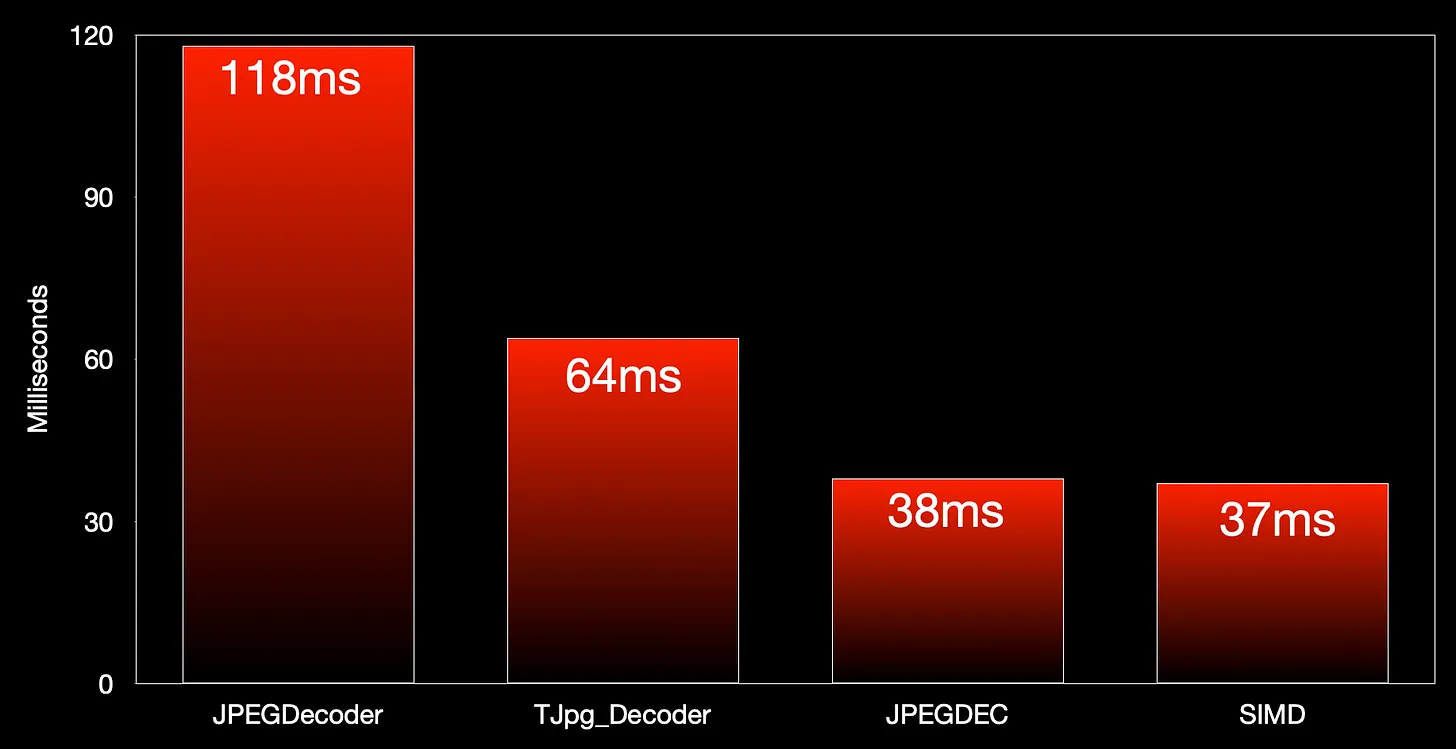
The extra time needed to draw the image is really high for our new library - in fact it now only performs as well as our existing JPEGDEC library.

This is kind of weird - we’re pushing exactly the same number of pixels to the display - why should the new library have such a big overhead when drawing?

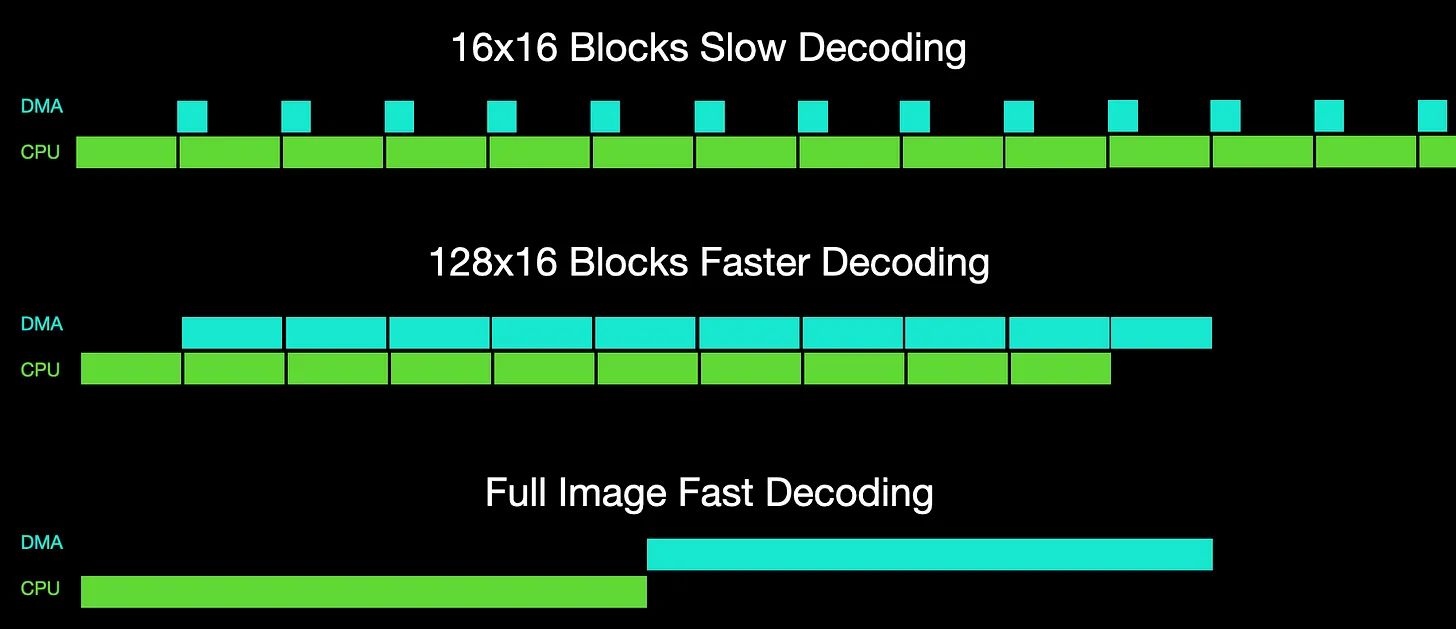
There’s actually a pretty simple explanation for this. We’re using DMA to draw pixels. With our existing libraries we decode the JPEG image one block of pixels at a time. With the JPEGDecoder and TJpg_Decoder libraries this is a block of 16x16 pixels. With the JPEGDEC library it’s 128x16 pixels - If you check out the video I’ve slowed down the drawing so you can see this.

This means that we can send a block of pixels off to the display using DMA, which then lets the CPU get on with decoding the next block of pixels - while the previous block is being sent to the display.

With the new fast library the image is decoded all in one go - this means that we don’t get any overlap. The CPU does its work, and then the DMA pushes all the pixels out at once.

CPU/DMA Overlap

Initially this might seem a little bit disappointing, but it’s actually not the end of the world - particularly for out TV project where we are streaming frames.

We can decode a frame using the CPU and kick off the DMA transfer to display the pixels. And then we can immediately kick off decoding the next frame. This overlapped decode/display process can give us a really fast frame rate.

Overlapped Decode/Display

I’ve done some very simple experiments and managed to get around 40 frames per second - which is pretty impressive!

You can watch the detailed video here:

#DMA #ESP32 #IMAGE DECODING #JPEG #PERFORMANCE OPTIMIZATION #SIMD

Related Posts

Decoding AVI Files for Fun and... - After some quality time with my ESP32 microcontroller, I've developed a version of the TinyTV and learned a lot about video and audio streaming along the way. Using Python and Wi-Fi technology, I was able to set up the streaming server with audio data, video frames, and metadata. I've can also explored the picture quality challenges of uncompressed image data and learned about MJPEG frames. Together with JPEGDEC for depth decoding, I've managed to effectively use ESP32's dual cores to achieve an inspiring 28 frames per second. Discussing audio sync, storage options and the intricacies of container file formats for video storage led me to the AVI format. The process of reading and processing AVI file headers and the listing subtype 'movi' allowed me to make significant headway in my project. All in all, I'm pretty chuffed with my portable battery powered video player. You can check out my code over on Github!
ESP32-S3 Hardware SPI on the Adafruit ST7789 - I've had some commenters point out the issue with the slow display updates in my recent Arduino Nano ESP32 video. It turns out, the software SPI of the Adafruit_ST7789 library was the culprit. Lo and behold, the solution is simple - using the hardware SPI constructor of the library. Apparently, this isn't well documented, so I wrote some code to serve as reference for myself and others who might run into the same snags. Trust me, the difference in speed is absolutely bonkers. Check out the video to see the magic in action.
ESP32-S3 USBMSC - Can we make it faster? - After lots of tinkering, I've managed to improve the speed of writing to the SD Card of my ESP32-TV considerably, but it's still not as fast as I'd like. The Arduino 'readRaw' and 'writeRaw' functions were the culprits, they can only write one sector at a time! After bypassing this and using IDF functions, writing speed improved by 70%. I also experimented with writing to the SD Card in the background, which ironically yielded even better results. However, it's still slower than I'd like, so I've got a crazy new plan: using a cheap IC (GL823) for SD card interfacing and a USB multiplexer switch to swap connections between ESP32 and GL823. It's a wild ride, but that's how we make progress!
Self Organising WS2811 LEDs - I've successfully used addressable WS2811 LED strings and an ESP-CAM board to create an adjustable lighting system. The best part is that the image processing code can be duplicated in JavaScript which allows you to use a plain dev board to drive the LEDs instead of needing a camera on your ESP32 board. If you want to replicate this project, you'll need your own ESP32 dev board and some addressable LEDs. After figuring out the location of each LED in 2D space, it's easy to map from each LED's x and y location onto a pattern you want to show on the frame buffer. Desiring to keep it accessible, I've posted detailed instructions and my sample code on GitHub, making sure anyone with basic knowledge can undertake this fun technological DIY project!
ESP32 I2S DMA Settings - dma_buf_len and dma_buf_count Explained - In this blog post, we delve deep into the intriguing concepts of I2S audio and DMA, particularly focusing on parameters like dma_buf_count and dma_buf_len. We explore their roles, ideal values, and the impacts they have on aspects such as CPU load and latency. We also discuss the limitations that come hand in hand with these parameters. This post aims to provide you some insights on trading-off between latency, CPU load, memory usage and the overall buffer space allocation. However, the primary takeaway remains that the optimal configurations largely depend on individual context and application needs.

Related Videos

ESP32 Super Fast JPEG Decoder - 20ms! - In my exploration for the fastest JPEG decoder for the ESP32, I trod a path from the original JPEG decoder library at 109 milliseconds, to the accelerated TJPEG decoder at 55 milliseconds, and finally the impressive JPEG dec library at 32 milliseconds. But wait, there's more. Along came a GitHub issue suggesting decoding JPEG with SIMD, efficiently working wonders at a decoding speed of just 20 milliseconds. However, it threw a curveball when it came to drawing. The decoding process doesn't overlap with the pixel transfer making it slower than expected. It does bring great benefits for streaming JPEGs though, as the decoding of the next frame can start while the current one is loading. But the space this library would expropriate, around 130 kilobytes, from the memory of an ESP32 module can be an issue. Yet, there are promising improvements marching on the horizon, so stay tuned for the upcoming enhancements!
Streaming Video and Audio over WiFi with the ESP32 - In this video, we dive into a hardware hack combining several components to create my version of the TinyTV, complete with a remote control, and video streaming over Wi-Fi. We challenge the speed of image display, using different libraries and tweaking performance for optimal results. We explore Motion JPEG or MJPEG to decode and draw images quickly, and even reach about 28 frames per second. We also catered audio using 8-bit PCM data at 16kHz, and deal with syncing both video and audio streams. Finally, we add some interactive elements allowing us to change channels and control volumes, with a classic static animation thrown in for good measure. There's a few hiccups along the way, but that's part of the fun, right?
ESP32 SD Card Speedup With a Couple of Lines of Code - In this video, we explore the disappointingly slow data writing speed of the ESP32 when reading and writing to an SD card in our TinyTV project. With 500 kilobytes/sec reading and a dismal 270 kilobytes/sec writing, we embark on an adventure to find a solution. After ditching the Arduino code in favor of IDF functions, we discover incredible improvements. Seeing potential risks, I propose a truly bonkers plan: using a IC to interface SD cards with USB with a USB multiplexer switch and another switch to alternate between ESP32 and the GL823. This could be a total disaster, but I'm game for the challenge. Stay tuned to see if it works out!
I Feel the Need – The Need for Hardware SPI… - An insightful iteration on my Arduino Nano esp32 video. Despite criticism regarding the slow display update speed, a solution was found thanks to the helpful fellow, Nick. Turns out, the software SPI was the cause of the issue. A quick tweak in the code and voilà, we've got ourselves an SPI clock whizzing at 80 megahertz. Quite the speed boost for just a few lines of code alteration!
Streaming Video From an SD Card on the ESP32. - In this video, we successfully navigated the convoluted process of setting up movie file playback from an ESP32 with an SD card. There were a few bumps along the way, such as confusing USB data pins and the intricacies of various video container formats, but our quirky PCBWay board came through. Discussed an ingenious method of creating a simple custom video container format with ffmpeg that can be effortlessly parsed by the ESP32. And yes, even though the tiny TV guys use AVI files, we pushed boundaries and learned a thing or two about list chunks, sub formats, and hex dumps. The result? We achieved smooth audio playback and video frame skipping for an optimal balance. Check out the streaming version on WiFi for more fun!
HELP SUPPORT MY WORK: If you're feeling flush then please stop by Patreon Or you can make a one off donation via ko-fi
Want to keep up to date with the latest posts and videos? Subscribe to the newsletter
Blog Logo

Chris Greening


Published

> Image

atomic14

A collection of slightly mad projects, instructive/educational videos, and generally interesting stuff. Building projects around the Arduino and ESP32 platforms - we'll be exploring AI, Computer Vision, Audio, 3D Printing - it may get a bit eclectic...

View All Posts