View All Posts
read
Want to keep up to date with the latest posts and videos? Subscribe to the newsletter
HELP SUPPORT MY WORK: If you're feeling flush then please stop by Patreon Or you can make a one off donation via ko-fi
#ARDUINO #ESP32 #GL823 #SD CARD #SDIO #SPI #USB MULTIPLEXER SWITCH #USBMSC

I’ve been doing some more work on my ESP32-TV. We got streaming from the SD Card working previously. So I really wanted to make it easier to get videos onto the SD Card without having to take it out and plug it into my computer.

Enter USBMSC - USB Mass Storage Class. This is a standard way of connecting a USB device to a computer and making it look like a disk drive.

It’s really easy to get this to work on the ESP32-S3. We just need to supply three callback functions.

#include "USBMSC.h"

USBMSC msc;

msc.onRead(onRead);
msc.onWrite(onWrite);
msc.onStartStop(onStartStop);

The onRead and onWrite functions are called when the computer wants to read or write data to the SD Card. The onStartStop function is called when the computer wants to eject the SD Card.

Both the onRead and onWrite take a sector number and a buffer. The buffer is always a multiple of the sector size (512 bytes). The onRead function should fill the buffer with the data from the sector(s). The onWrite function should write the data from the buffer to the sector(s).

Typically I found that I received a buffer size of 4096 bytes - which is the equivalent of eight 512 byte sectors.

The Arduino SD class has two functions we can use for writing to sectors:

SD.writeRAW(sector, buffer);
SD.readRAW(sector, buffer);

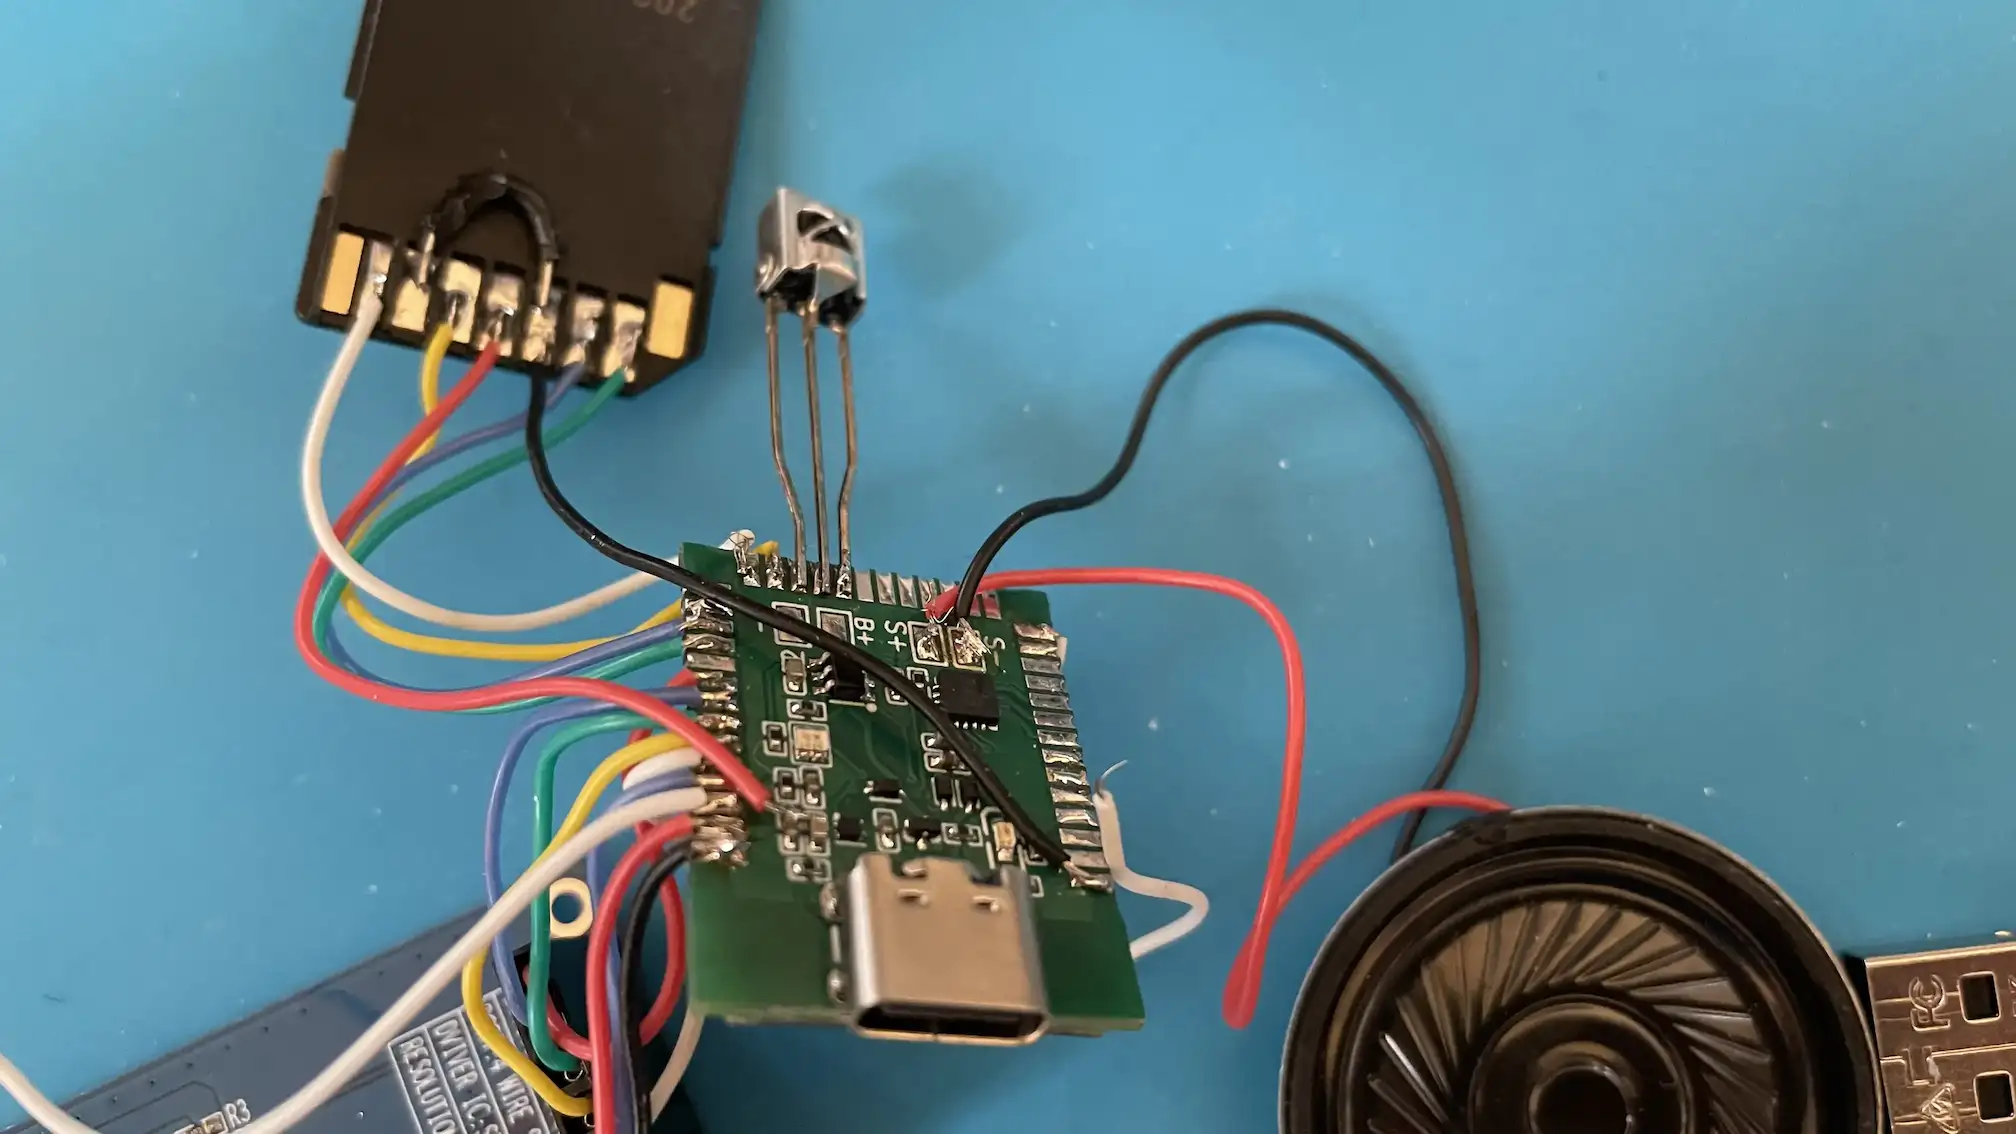
So I wired it all up and… it’s really slow.

Slow USBMSC

Writing is terrible 270KBytes/s - we’d be much better off just disconnecting the SDCard from the ESP32 and plugging it in directly.

Surely we can do better than this?

It certainly not a limitation of our SD Card - if we plug it directly into my laptop we get 26MBytes/s write and 90MBytes/s read.

Fast SD Card

But we’re not plugging it directly into our computer, we’re running our ESP32 as a mass storage controller and connecting through that to the SD Card.

The ESP32-S3 only supports USB 1.1 full speed mode. This gives us a maximum transfer rate of 12Mbit/s over the USB connection - theoretically, this could give us 1.5MBytes/s - but there are overhead in the USB protocol. It feels like 1MBytes/s is probably much closer to what is achievable.

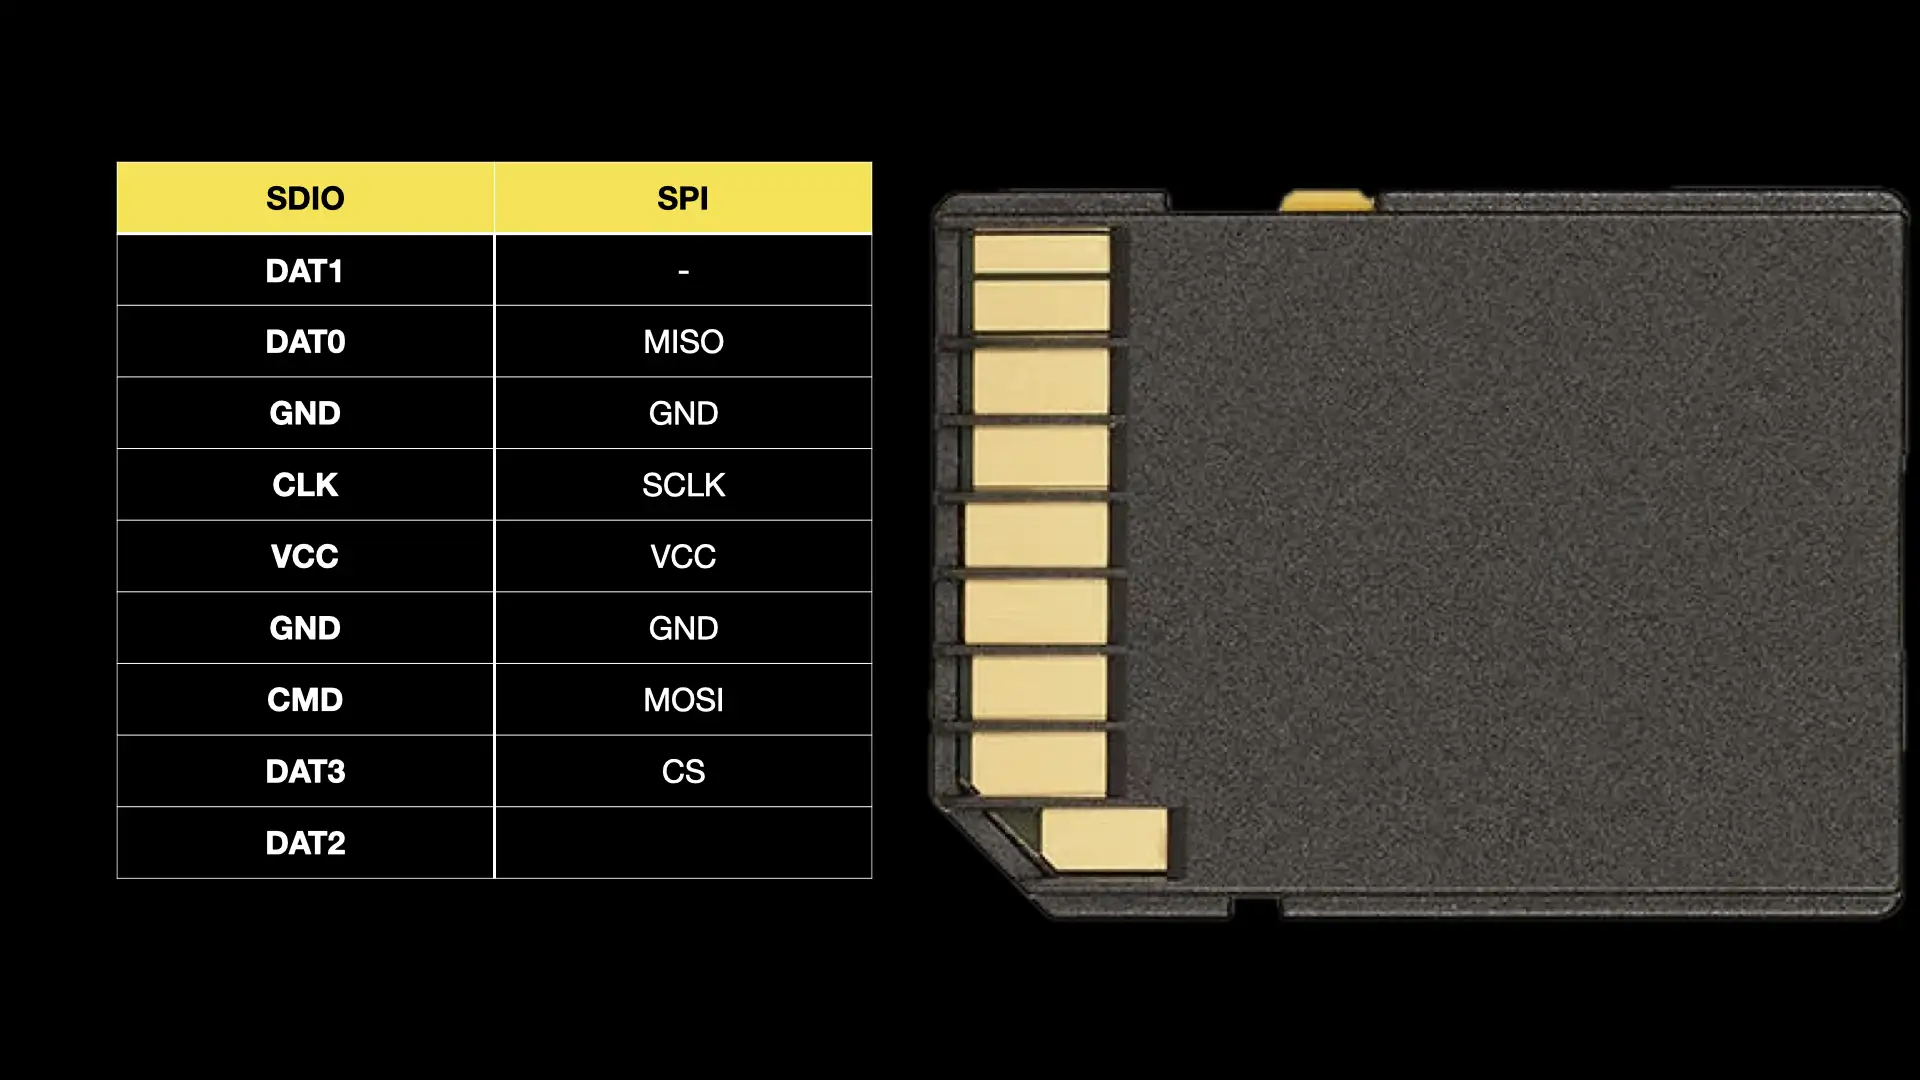
We’ve also got the limitations of our ESP32 connection to the SDCard - we’re connecting to it using SPI - the actual clock speed this connects at will depend on several factors, but with the cards and wiring I’m using I seem to get 20MHz reliably. With better wiring we might be able to get 40MHz, but for that we’ll need a proper PCB with an SD Card slot on it.

It’s amazing that we can get 20MHz with the current wiring.

Wiring

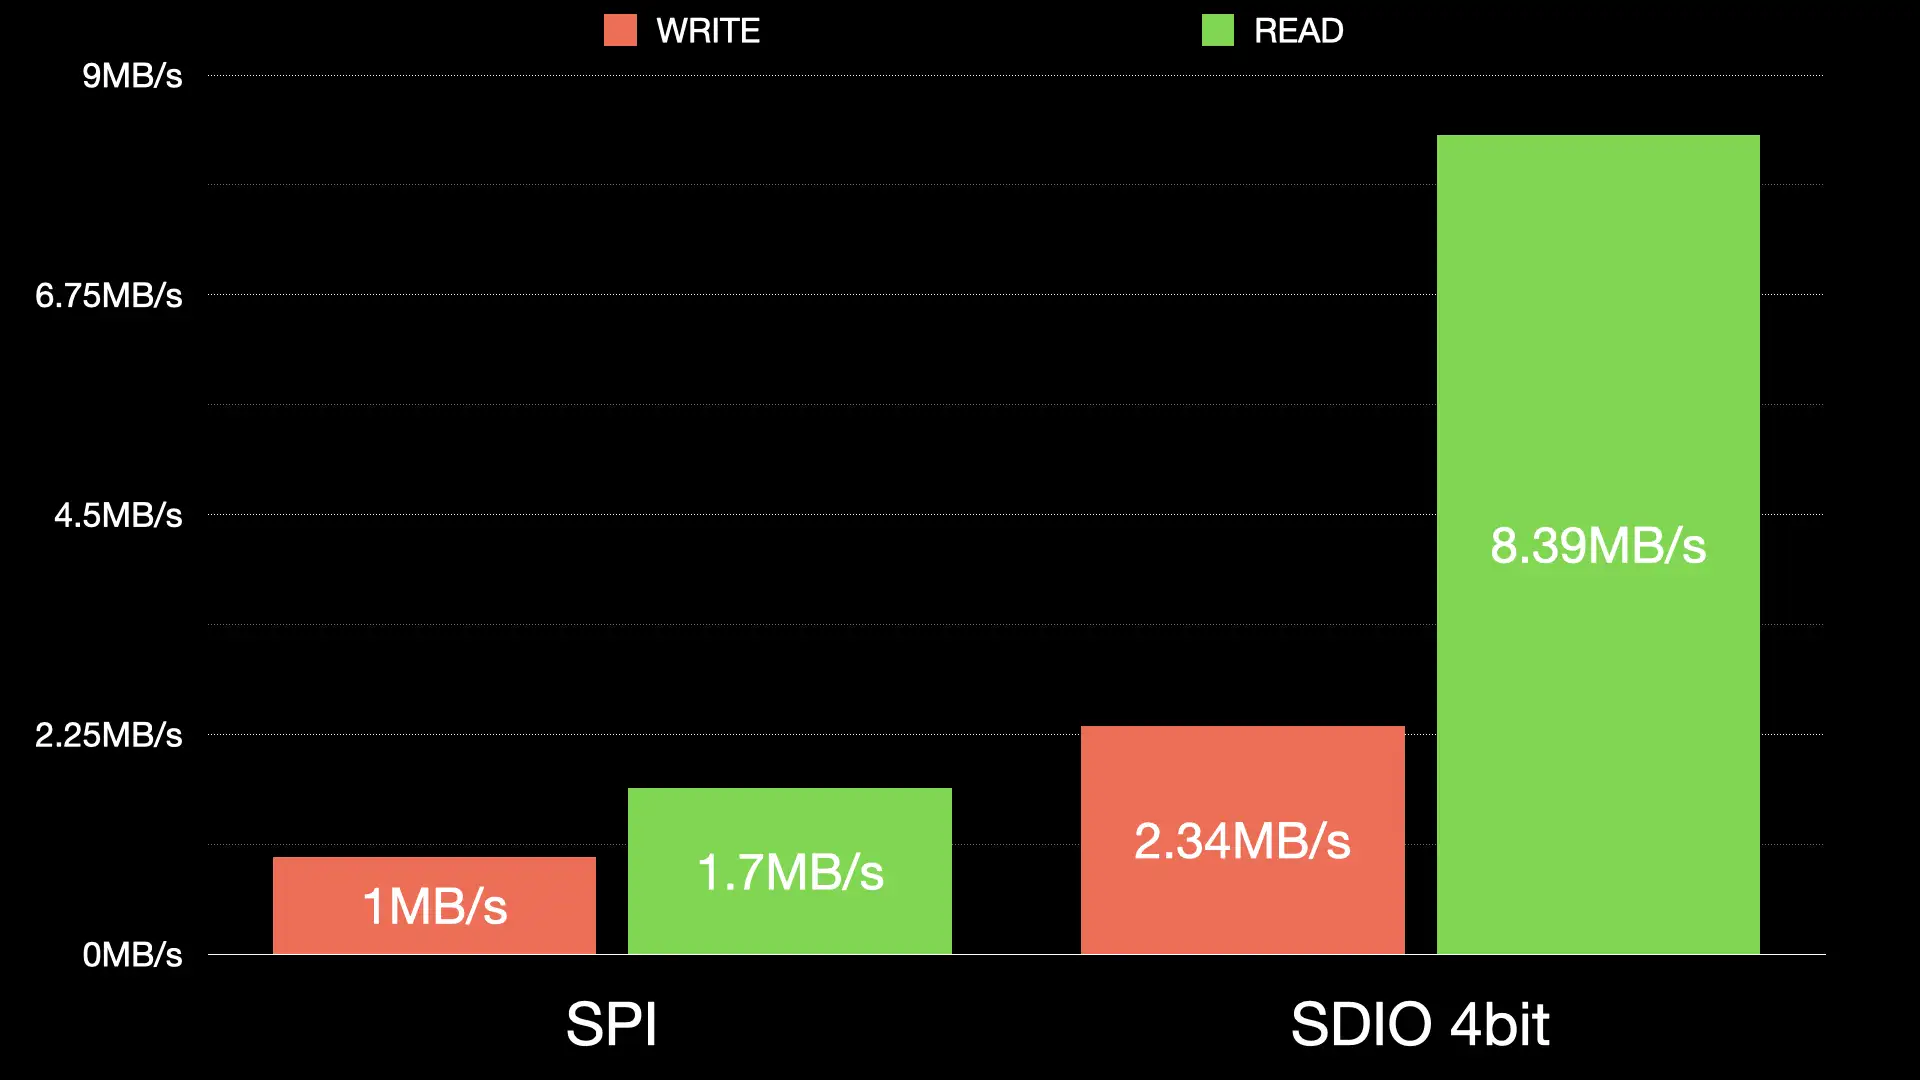
Reading and writing raw sectors to the SD Card I get 1MBytes/s write speed and 1.7MBytes/s read speed. So it feels like 1MByte/s writing and 1MByte/s reading should be achievable.

We can of course use SDIO in 4 bit mode to talk to our SD Card - that involves some extra GPIO pins, but it does give us much better performance.

SDIO 4 bit

If we connect up a card in this mode we get 2.34MBytes/s for writing and an amazing 8.39MBytes/s reading.

SDIO 4 bit vs SPI

So, why is our speed so slow when we connect to the card over USB through the ESP32? 270KBytes per second is almost a quarter of what we should be getting. It’s not great.

The problem is the Arduino readRaw and writeRaw functions. One issue is that they don’t seem to be available on the SDMMC class - so we can only use them in SPI mode. The other issues is that they can only write one sector at a time.

Frustratingly if you drill into the functions they are actually calling functions that can write multiple sectors at once - it’s just not exposed to us.

So, I’ve ignored the Arduino code and gone straight to the IDF functions. These have a couple of friendly functions: sdmmc_write_sectors and sdmmc_read_sectors. What’s more these functions work in both SPI and SDIO mode.

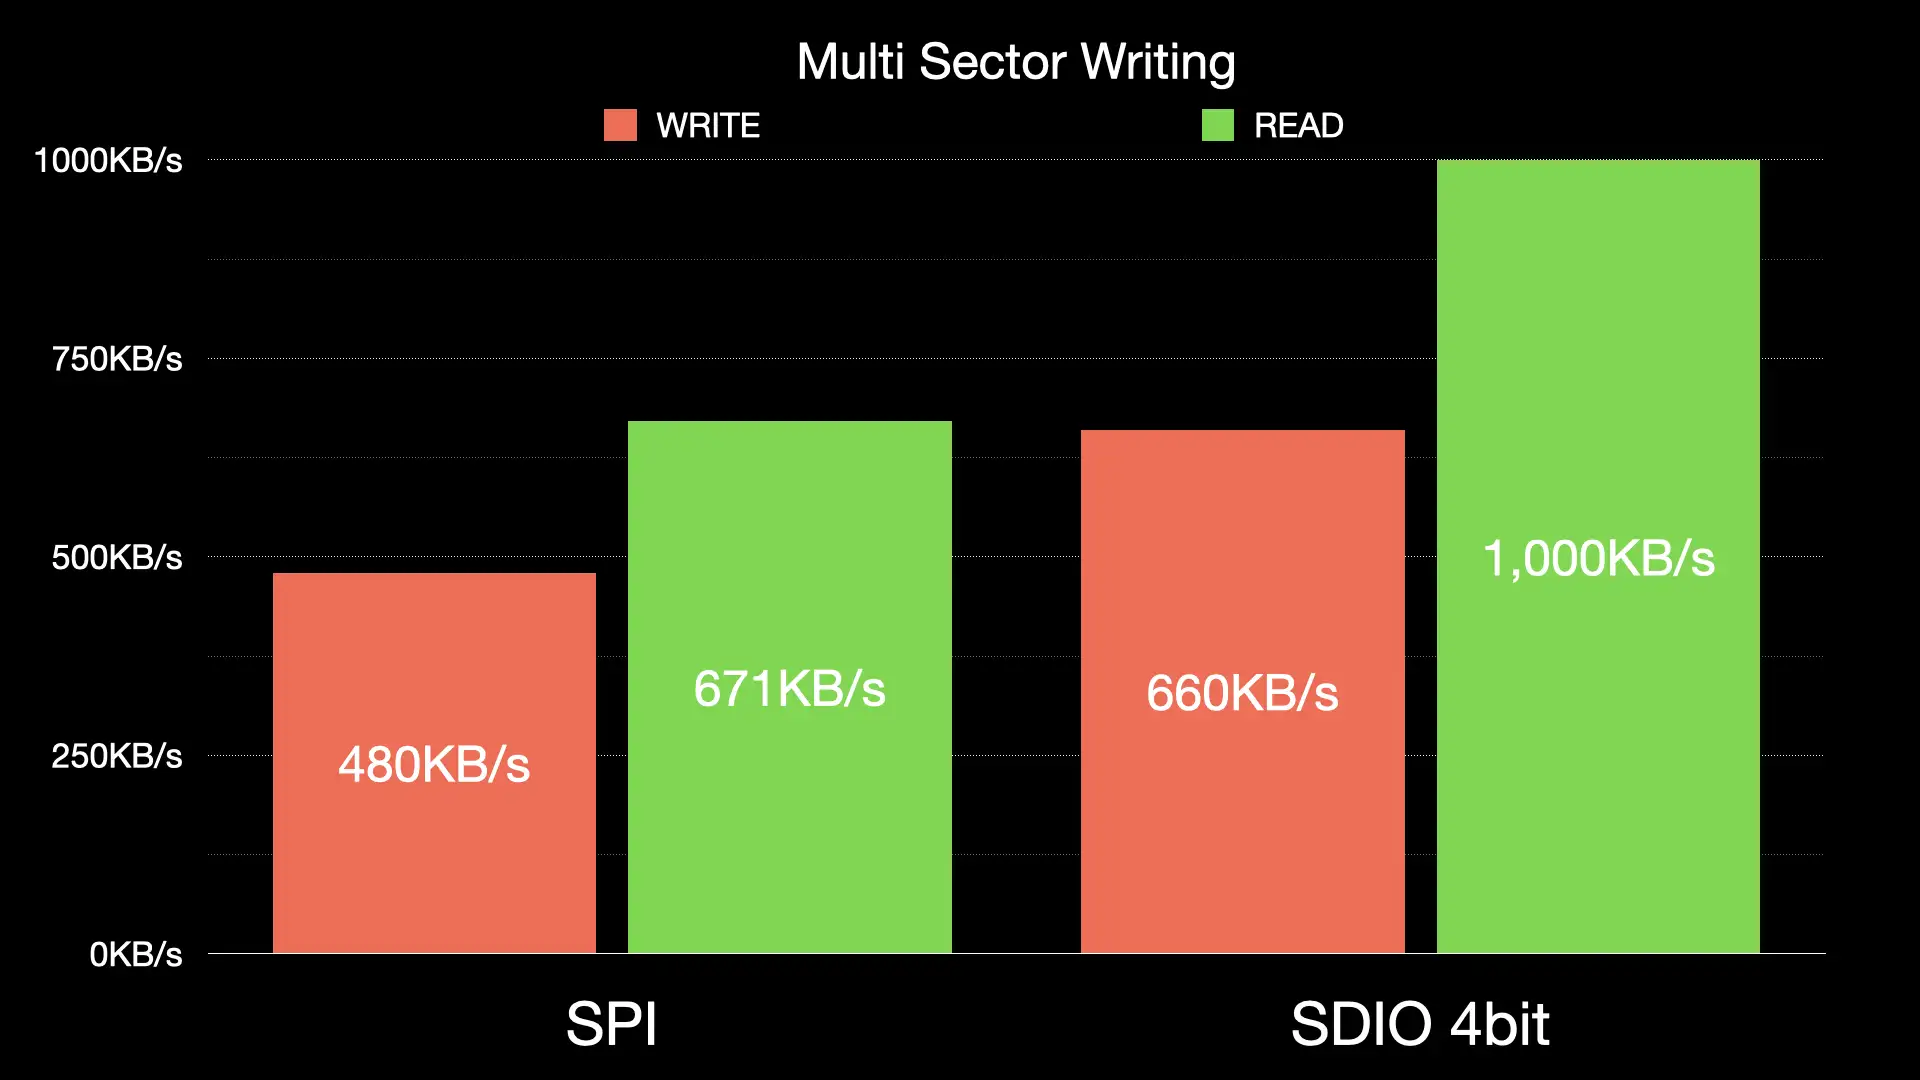
In SPI mode using these function to write and read the data all in one go we improve the write performance by over 70% - it’s now writing at 480KBytes/s instead of 270KBytes/s.

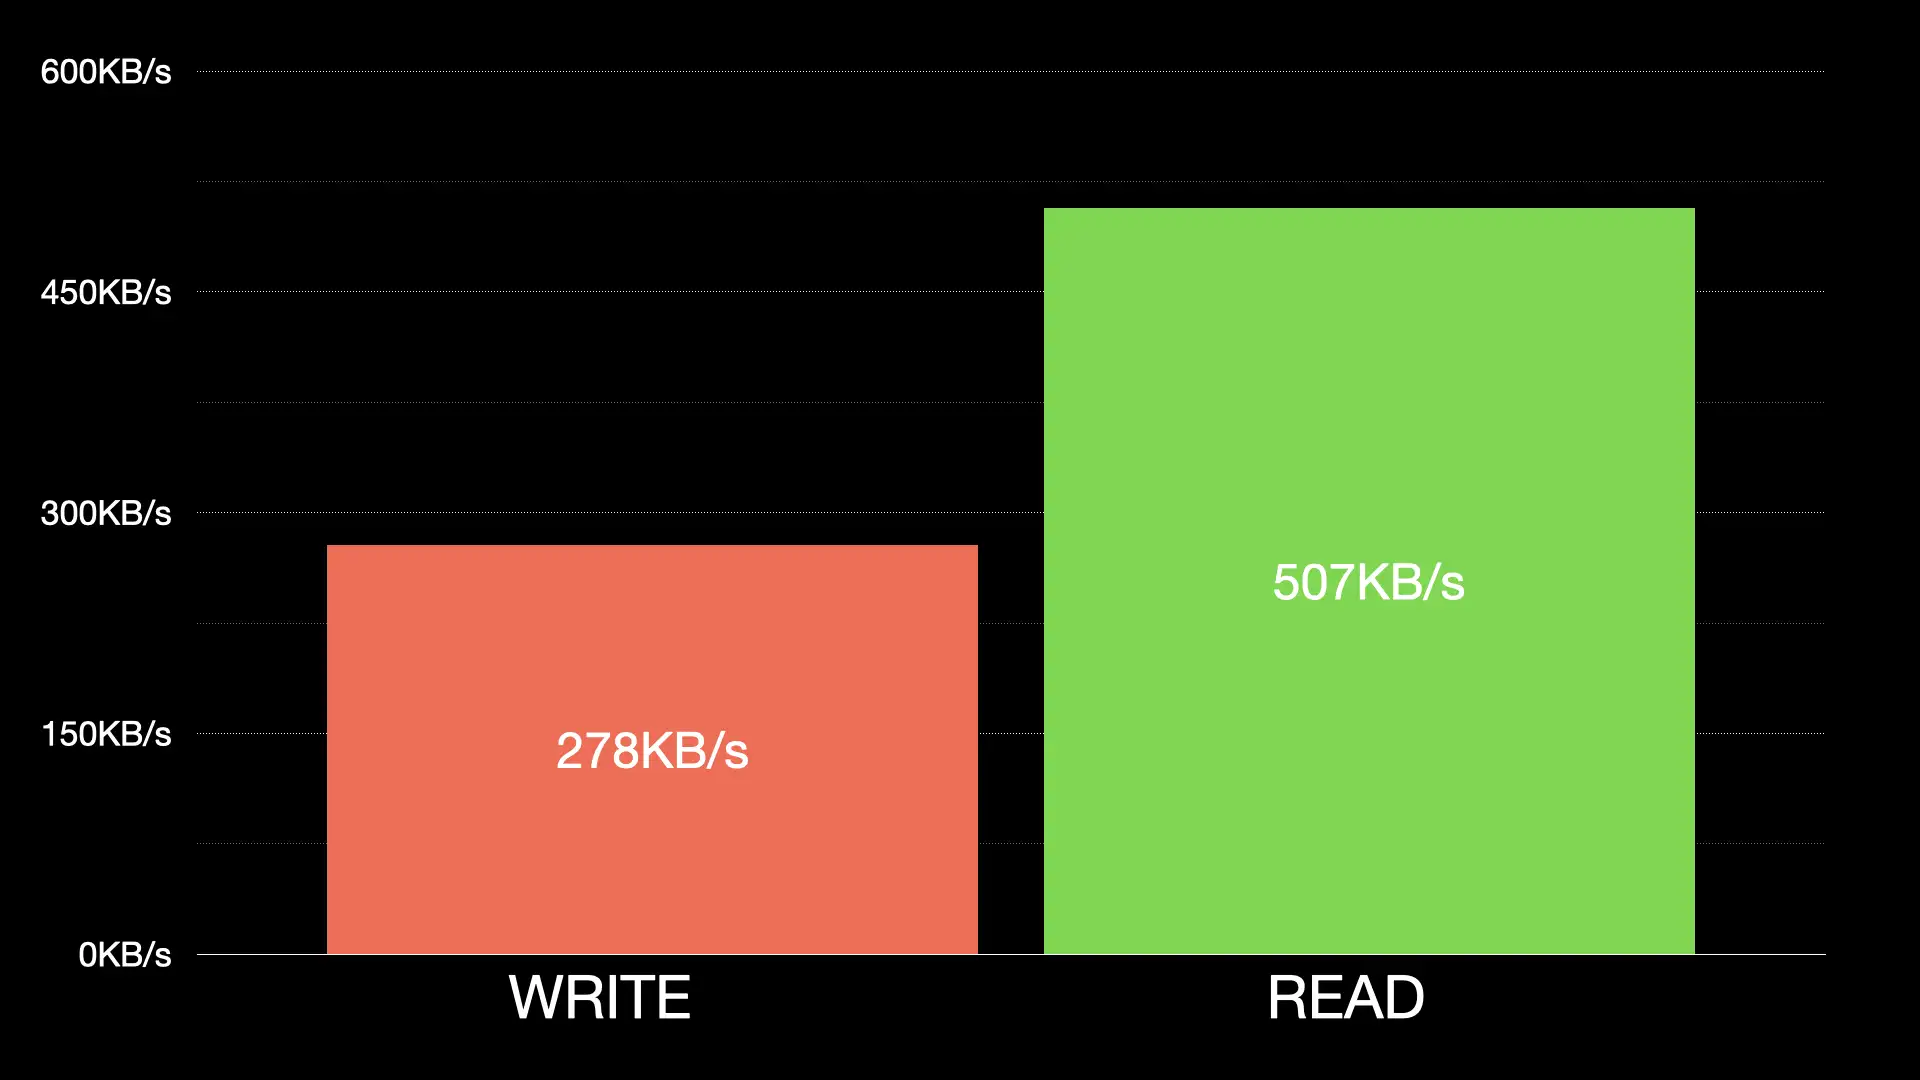
Our read speed has also improved by 32%. We’re getting 671KBytes/s instead of 507KByte/s.

If we use the SDIO 4 bit connection we get even better performance - we can now write at 0.66MBytes/s and reading is an incredible 1MBytes/s - that’s probably as fast as we can go over the USB1.1 connection.

Multi Sector Writing

It’s a pretty amazing improvement from some very simple code changes.

Reading is now performing as fast as I think is possible. But it feels like writing could still be improved.

So I thought I’d try something a bit dodgy. We don’t actually need to wait for the writing to the SDCard to complete before returning.

What if we ran the writing to the SDCard in the background and returned straight away.

We would lose any proper error handling and we’ll need to be careful to wait for writes to complete before allowing any reading, but we could get quite a performance improvement as the transfers to the SD Card could be overlapped with the transfers coming from the USB connection.

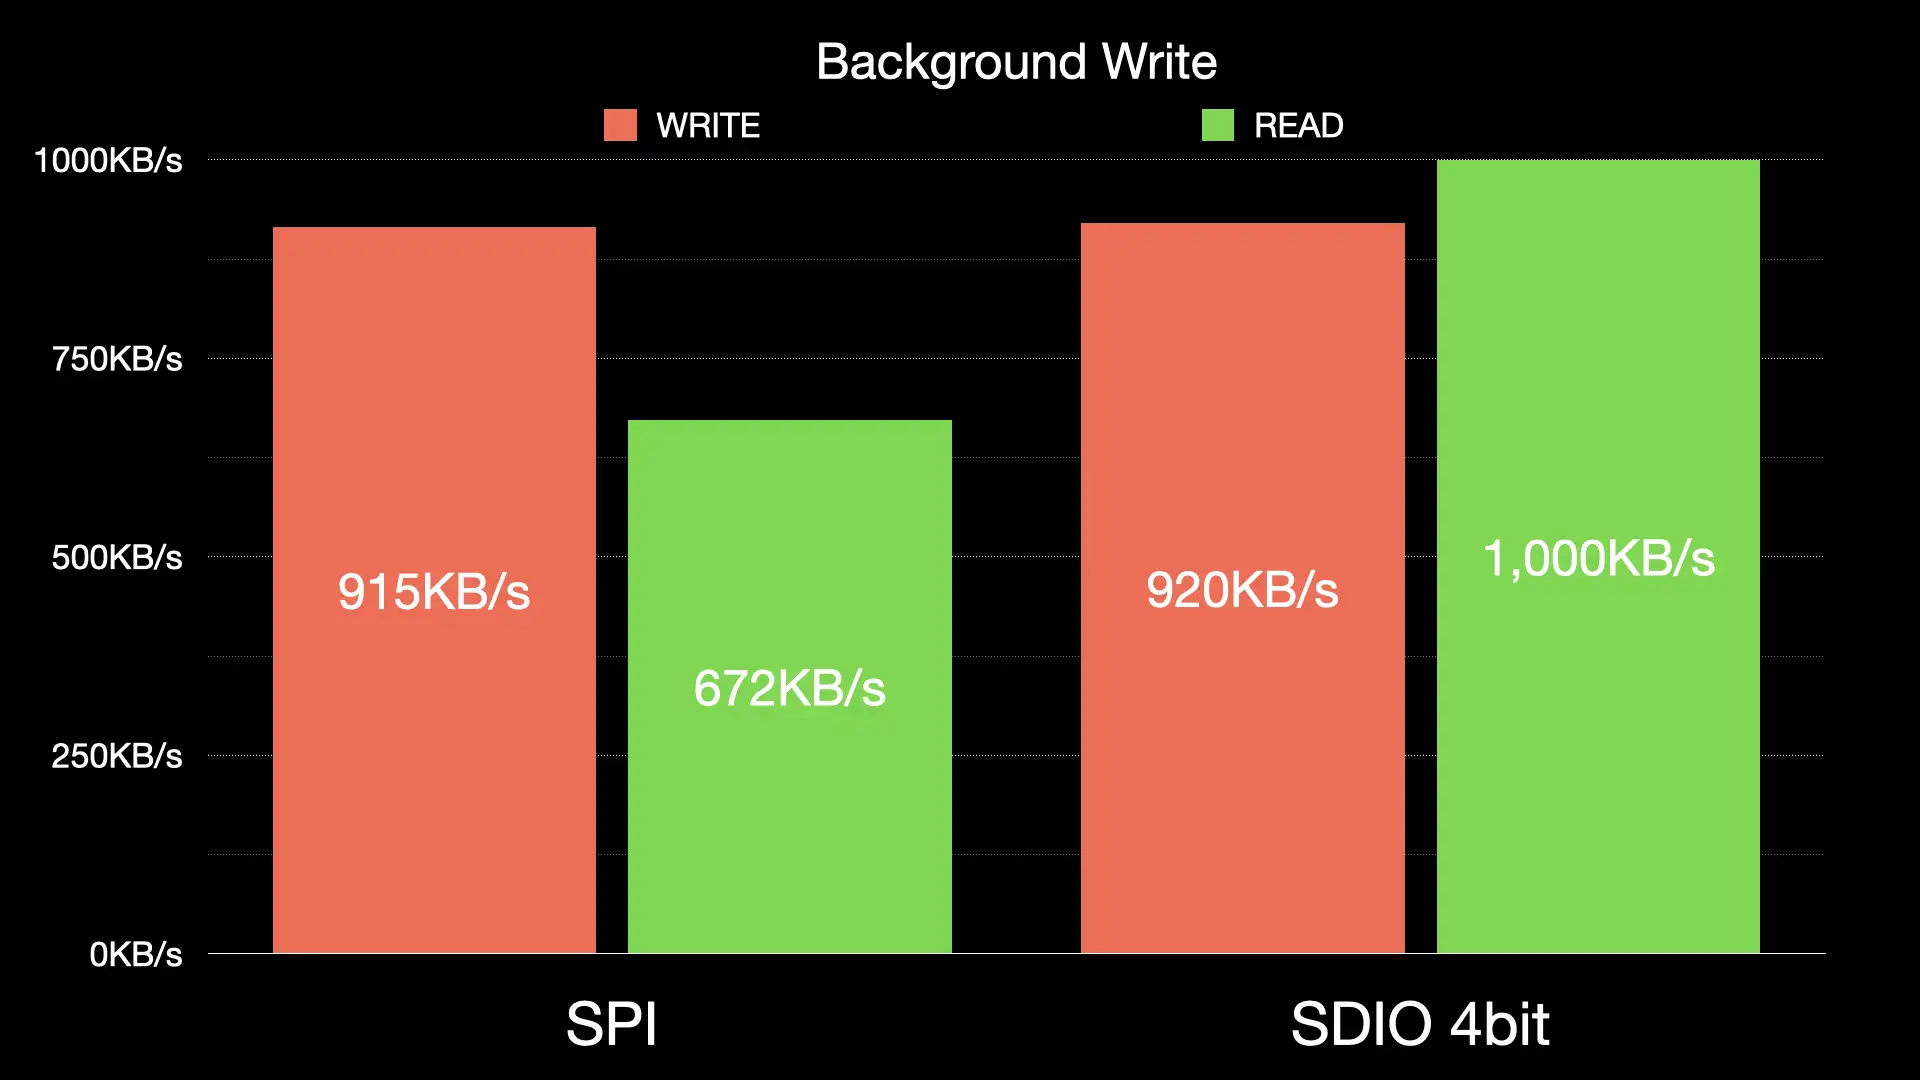
So I’ve given that a go. With the SPI connection can now get almost 1MByte/s write performance. It’s actually 915KBytes/s which is 229% faster than our original 270KBytes/s and 90% faster than our multisector writing method.

With the SDIO 4 bit connection we get similar results - so I suspect we’ve definitely hit the limits of what’s possible with our USB connection.

Lazy Writing

Obviously there’s no impact on the read speed, this stays pretty much exactly the same as our multi sector read version.

The big question we have to ask is, is this actually safe to use.

And in answer, I really have no idea. We now have no error handling when writes fail so potentially we could get our card into quite a weird state. But lots of hard disk controllers buffer writing so maybe it’s fine.

Is it good enough for our ESP32-TV project?

Short videos around 5 minutes end up 50Mbytes in size once they’ve been converted to AVI files. So to copy that to our SDCard we’d need about 1 minute. That might be acceptable acceptable, but to me it’s annoyingly slow.

We’re going to need some kind of alternative.

The simple solution is to just let people take the SDCard out and plug it directly into their PC - and that’s my fallback option.

But I’ve also got a slightly bonkers idea.

There is a really cheap IC for interfacing SD Cards with USB - the GL823. This will run over USB2.0 at a whopping 480Mbs which would give us much faster access to our SD Card.

I’ve also found a handy USB multiplexer switch which is also really cheap.

And I’ve found another switch IC that would let us switch the SD Card between the ESP32 and the GL823. It’s got six lines so we could run the ESP32 is SDIO 4bit mode if needed.

Now potentially this could completely fail, but I think it’s worth a try.

The way I’m thinking this will work is that we’ll start off with the USB connections routed to the ESP32 and the GL823 powered down or held in reset mode. We’ll also have the SDCard powered up and routed through to the ESP32.

ESP32-S3 USB Mode

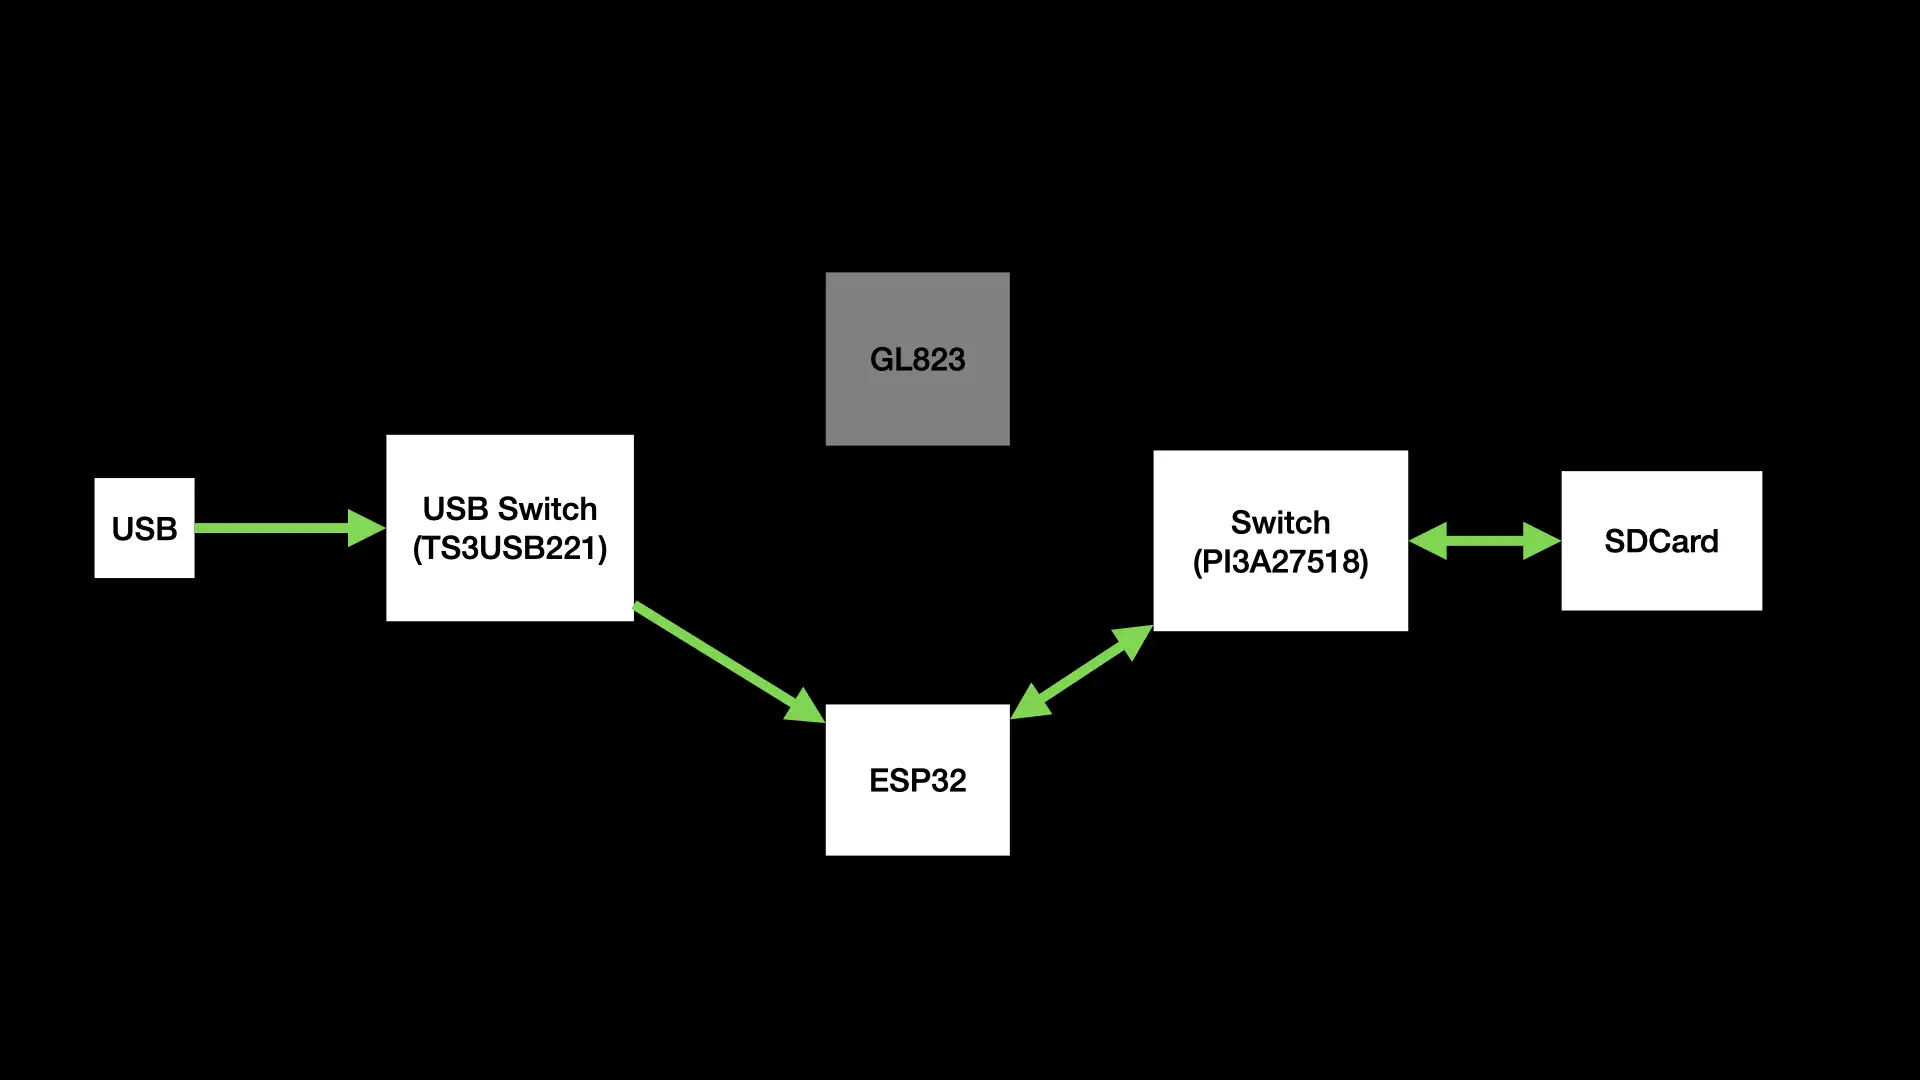
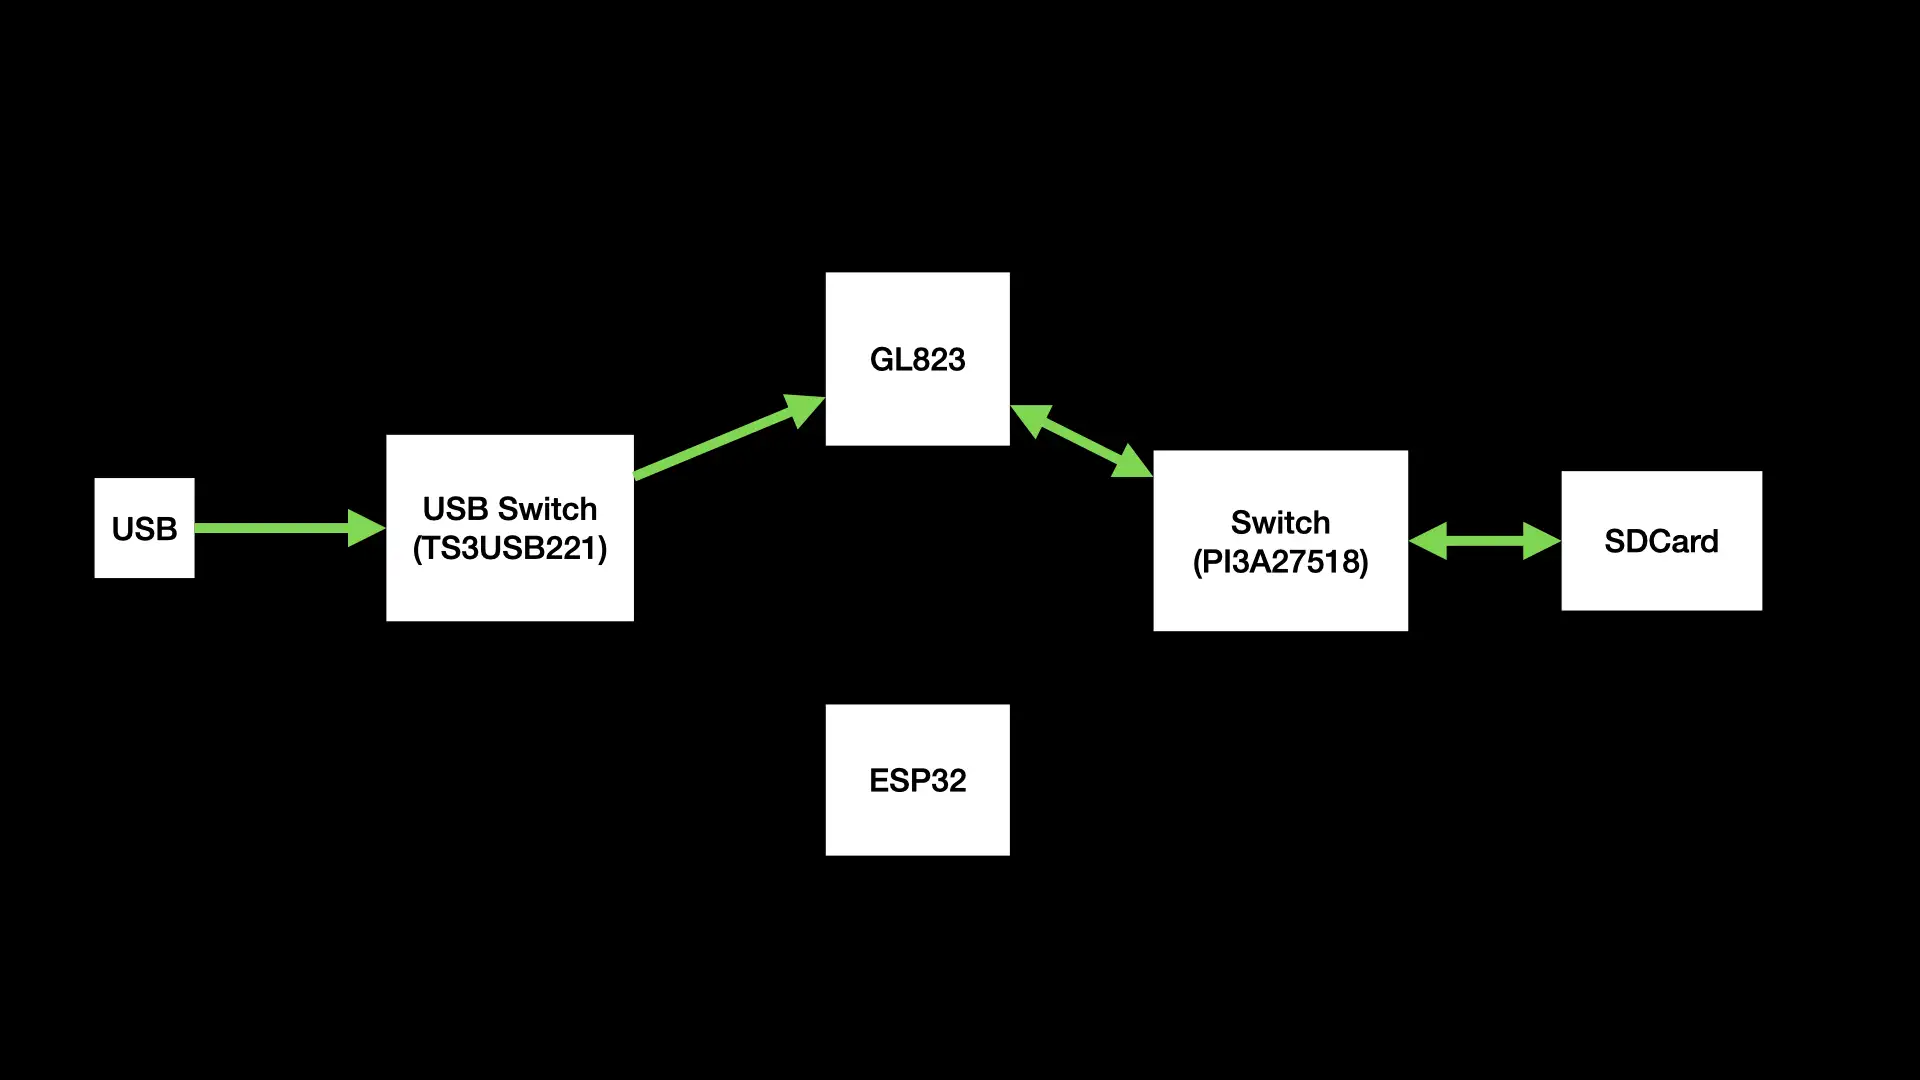
If the user wants to connect to the SD Card we’ll shutdown the ESP32s USB peripheral and switch the USB connection over to the GL823. We’ll then turn the SD Card off and connect it to the GL823.

We’ll power up the GL823 and the SDCard and in theory it should connect up to the computer.

GL823 USB Mode

I can’t think of any way of switching off this mode - there doesn’t seem to be any signal from the GL823 to indicate that the device has been ejected, so we’ll have to rely on the user unplugging the USB.

It’s a long shot, but I think this could work.

The other option would be to transfer the files using WiFi and write them directly to the SDCard. But I really want to the get the USB solution working now.

#ARDUINO #ESP32 #GL823 #SD CARD #SDIO #SPI #USB MULTIPLEXER SWITCH #USBMSC

Related Posts

A Faster ESP32 JPEG Decoder? - An intriguing issue appeared in the esp32-tv project that deals with speeding up JPEG file decoding using SIMD (Single Instruction Multiple Data) instructions, showing immense performance boost. However, there were some notable differences in speed when it comes to drawing the images versus simply decoding them. The problem was found to be with the DMA drawing mechanism and the way the new fast library decodes the image all at once. But despite this hiccup, by overlapped decoding and displaying process, a high frame rate can still be achieved. Joined me in this dissecting process and my initial tests showing approximately 40 frames per second display rate, on our journey to find the most efficient way to get images on screens.
ESP32-S3 Hardware SPI on the Adafruit ST7789 - I've had some commenters point out the issue with the slow display updates in my recent Arduino Nano ESP32 video. It turns out, the software SPI of the Adafruit_ST7789 library was the culprit. Lo and behold, the solution is simple - using the hardware SPI constructor of the library. Apparently, this isn't well documented, so I wrote some code to serve as reference for myself and others who might run into the same snags. Trust me, the difference in speed is absolutely bonkers. Check out the video to see the magic in action.
Minimalist Microcontroller: Building a Bare-Bones Dev Board - In a thrilling DIY endeavour, I attempted to build the most minimalist ESP32 dev board possible. Diving deep into the schematic of the ESP32 S3 WROOM module, I chopped out the non-essentials and whittled our needs down to bare bones. The experiment saw me juggling USB data lines and voltage regulators, waving goodbye to an array of capacitors and connectors and boldly embracing the simplicity of direct connections. Despite a few hitches, the miniature Frankenboard came alive, proving that sometimes less is more...at least in the world of microcontrollers.
The PCBs are in production - what have I messed up? - After some stress and trepidation, I finally took the plunge and sent my PCB design off for manufacturing. My design centers around building a large seven-segment clock with LED filaments. Jumping hurdles such as voltages, pin usage, and limiting the load on my power supply, I've settled on the ESP32 as the system's heart and come up with a final circuit design. While doing this, I've quickly realized I could improve my layout and fixed a small mistake. Also, I've prepared for either types of LED filaments - the high-voltage ones or the larger, 3v ones. However, I did bungle up a couple of things on the enable line of the shift registers and board layout. But hey, this is a learning curve, right? Can't wait to get the boards and see what other exciting errors surface!
Decoding AVI Files for Fun and... - After some quality time with my ESP32 microcontroller, I've developed a version of the TinyTV and learned a lot about video and audio streaming along the way. Using Python and Wi-Fi technology, I was able to set up the streaming server with audio data, video frames, and metadata. I've can also explored the picture quality challenges of uncompressed image data and learned about MJPEG frames. Together with JPEGDEC for depth decoding, I've managed to effectively use ESP32's dual cores to achieve an inspiring 28 frames per second. Discussing audio sync, storage options and the intricacies of container file formats for video storage led me to the AVI format. The process of reading and processing AVI file headers and the listing subtype 'movi' allowed me to make significant headway in my project. All in all, I'm pretty chuffed with my portable battery powered video player. You can check out my code over on Github!

Related Videos

ESP32 SD Card Speedup With a Couple of Lines of Code - In this video, we explore the disappointingly slow data writing speed of the ESP32 when reading and writing to an SD card in our TinyTV project. With 500 kilobytes/sec reading and a dismal 270 kilobytes/sec writing, we embark on an adventure to find a solution. After ditching the Arduino code in favor of IDF functions, we discover incredible improvements. Seeing potential risks, I propose a truly bonkers plan: using a IC to interface SD cards with USB with a USB multiplexer switch and another switch to alternate between ESP32 and the GL823. This could be a total disaster, but I'm game for the challenge. Stay tuned to see if it works out!
Can You Spot the Problem? - Buckle up folks, this video is a thrilling one! There's everything from unboxing my new ESP32 TV boards that arrived from PCB Way to discovering some hidden issues. We're talking about some pesky problems, surprises, and even a potential catastrophic error that could've led to a disaster. The main dish is the high-speed SD card access over USB - ultimately achieving a whooping transfer rate! But, the journey is a roller-coaster ride, from the project completely failing initially, to some smart hacks and triumphant moments. All the peripherals worked well, from the display to the sound amplifier and even the infrared receiver. Despite the ups and downs, there's a lot to learn and that's what makes this video exciting! Can't wait to share the improvements I have in mind for turning the prototype into the ultimate all-in-one device. But first, let's address the elephant in the room - an ill-placed diode that's a ticking bomb, because you know, safety first!
I Feel the Need – The Need for Hardware SPI… - An insightful iteration on my Arduino Nano esp32 video. Despite criticism regarding the slow display update speed, a solution was found thanks to the helpful fellow, Nick. Turns out, the software SPI was the cause of the issue. A quick tweak in the code and voilà, we've got ourselves an SPI clock whizzing at 80 megahertz. Quite the speed boost for just a few lines of code alteration!
Streaming Video From an SD Card on the ESP32. - In this video, we successfully navigated the convoluted process of setting up movie file playback from an ESP32 with an SD card. There were a few bumps along the way, such as confusing USB data pins and the intricacies of various video container formats, but our quirky PCBWay board came through. Discussed an ingenious method of creating a simple custom video container format with ffmpeg that can be effortlessly parsed by the ESP32. And yes, even though the tiny TV guys use AVI files, we pushed boundaries and learned a thing or two about list chunks, sub formats, and hex dumps. The result? We achieved smooth audio playback and video frame skipping for an optimal balance. Check out the streaming version on WiFi for more fun!
ESP32-S3 - Which Pins Are Safe To Use? - In this video, I've decided to dive deep into the ESP32-S3, a module ruling my lab recently due to its plug-in-and-play functionality, and the flexibility offered by its GPIO matrix. However, working with it requires vigilance, especially with regard to the strapping pins and USB data pins, among others. Discovering such quirks, I've encountered unexpected values, short glitches and the occasional code crash. To help you avoid these bumps, I've documented everything I've learned on my GitHub repo, where I'm inviting you, my fellow makers and engineers, to contribute your valuable experiences and findings. After a minor hiccup with my ESP32-TV, expect an updated PCB design, courtesy of PCBWay. Explore the ESP32-S3 with me, and let's unravel its secrets together, one pull request at a time.
HELP SUPPORT MY WORK: If you're feeling flush then please stop by Patreon Or you can make a one off donation via ko-fi
Want to keep up to date with the latest posts and videos? Subscribe to the newsletter
Blog Logo

Chris Greening


Published

> Image

atomic14

A collection of slightly mad projects, instructive/educational videos, and generally interesting stuff. Building projects around the Arduino and ESP32 platforms - we'll be exploring AI, Computer Vision, Audio, 3D Printing - it may get a bit eclectic...

View All Posts