🌈 ESP32-S3 Rainbow: ZX Spectrum Emulator Board! Get it on Crowd Supply →
View All Posts
read
Want to keep up to date with the latest posts and videos? Subscribe to the newsletter
HELP SUPPORT MY WORK: If you're feeling flush then please stop by Patreon Or you can make a one off donation via ko-fi
#ANIMATED GIF #BULK TRANSFER #DIY HARDWARE #EMBEDDED #ESP32-S3 #ESPRESSIF IDF #ESP_NEW_JPEG #JPEG ENCODING #MICROCONTROLLER GRAPHICS #MJPEG #PONG #REAL-TIME #TINYUSB #USB UVC #WEBCAM

TL;DR

  • The ESP32-S3 (and other Espressif modules - at time of writing: H4, P4, S3, S3) can act as a USB webcam using the standard UVC protocol
  • There is no camera connected — all frames are generated in software
  • We start with a static JPEG, move to animated GIFs, and finish with Pong running in real time
  • Video is sent as MJPEG (a stream of JPEG images) over USB
  • JPEG encoding on the ESP32-S3 is fast enough to make this practical

In this project, we turn an ESP32-S3 into something your computer happily believes is a USB webcam — even though there’s no camera connected at all.

For these set of projects, instead of streaming video from a sensor, the ESP32 generates frames in software, encodes them as JPEGs, and sends them over USB using the standard UVC (USB Video Class) protocol.

We build this up in three stages:

  1. A static test card (boring but does show it working)
  2. Animated GIF playback using MJPEG (kind of fun)
  3. A real-time game of Pong streamed as live video (forget TFT and OLED displays - just use your computer!)

You can find all the source code here.

How does it work?

At a high level, a USB webcam is just a device that:

  • Enumerates as a USB UVC device
  • Negotiates resolution and frame rate with the host
  • Sends a video stream to the host

In our case:

  • The ESP32-S3 provides native USB support
  • Espressif’s USB UVC device component handles enumeration and protocol details
  • We provide the video data — whether that’s a static JPEG, decoded GIF frames, or a game framebuffer

With Espressif’s usb_device_uvc component, we can do either MJPEG or H264. The underlying libary, TinyUSB, does have support for more formats.

MJPEG (Motion JPEG) is exactly what it sounds like: a sequence of individual JPEG images sent one after another. There’s no inter-frame compression — every frame stands alone.

The nice thing is, our computer doesn’t really care about the hardware - if it presents itself as a USB UVC device then our computer will see it as a web cam.

I did have some weird issues getting Isochronous mode working on the UVC component - I got very random frame stalls and glitches. This is likely to be somethign that I am doing in the code.

For all the demos I switched over to Bulk mode (this is set in menuconfig).

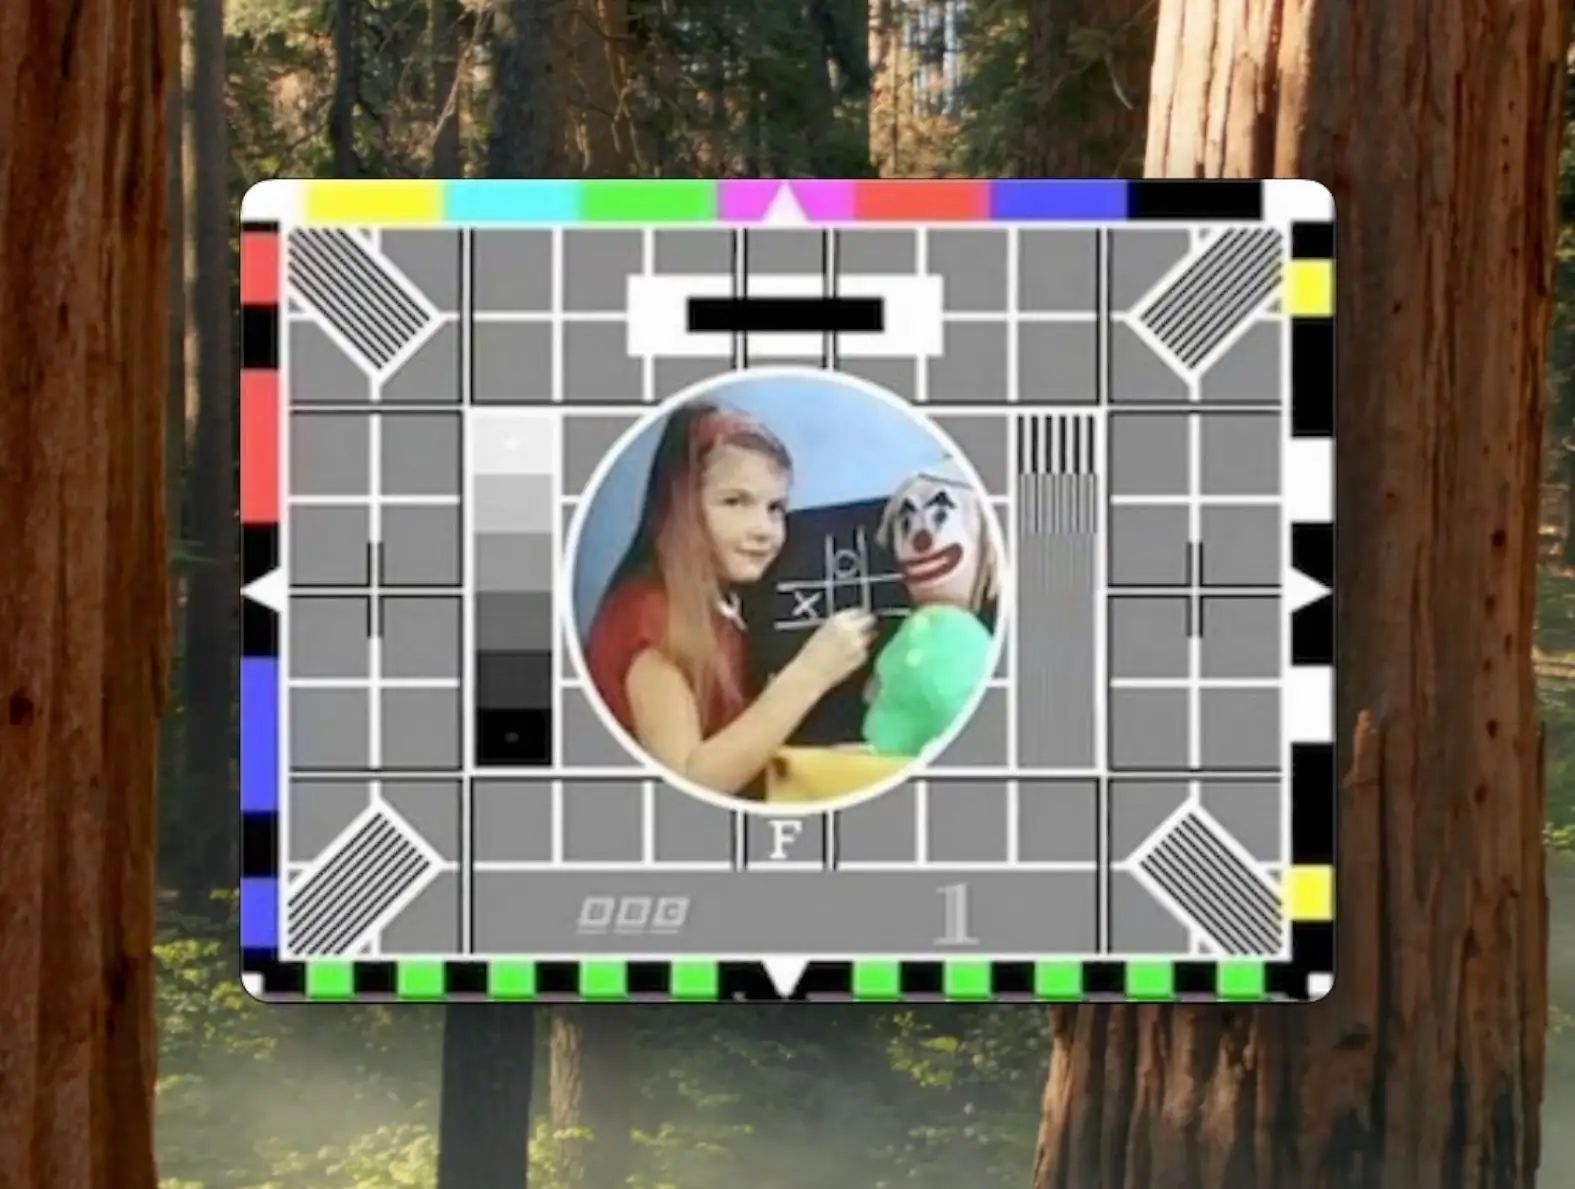
Demo 1: Static Test Card

The simplest possible (albeit most boring) webcam is one that just shows a static image.

For the first demo, we embed a single JPEG — a classic BBC test card — directly into the firmware. Whenever the USB host requests a frame, we return the same JPEG data.

This proves:

  • USB enumeration works
  • The host accepts the device as a valid webcam
  • MJPEG streaming is functional

Implementation Notes

We’re using the Espressif IDF for this project. This uses CMake and it’s pretty easy to embed binary data into our firmware.

idf_component_register(SRCS
                       "main.cpp"
                       "uvc_streamer.cpp"
                       PRIV_REQUIRES spi_flash
                       INCLUDE_DIRS ""
                       EMBED_FILES "test_card.jpeg")

And then you can reference it in code:

extern const unsigned char jpeg_start[] asm("_binary_test_card_jpeg_start");
extern const unsigned char jpeg_end[]   asm("_binary_test_card_jpeg_end");

const size_t jpeg_data_len = jpeg_end - jpeg_start;
const uint8_t *jpeg_data = jpeg_start;

Setting up the uvc component is as simple as providing it with a set of callbacks:

uvc_device_config_t config = {
    .uvc_buffer = uvc_buffer_,           // pointer to a buffer - this should be big enough for one of your JPEG frames
    .uvc_buffer_size = jpeg_data_len_,   // the length of the buffer
    .start_cb = camera_start_cb,         // called when things start up
    .fb_get_cb = camera_fb_get_cb,       // request for a new frame of data
    .fb_return_cb = camera_fb_return_cb, // the frame has been sent
    .stop_cb = camera_stop_cb,           // called when things stop
    .cb_ctx = nullptr,                   // passed into all the functions
};

The crucial callback to implements is camera_fb_get_cb. This returns a populated framebuffer that is sent over the wire to our PC.

uvc_fb_t *UvcStreamer::camera_fb_get_cb(void *cb_ctx) {
  uint64_t now_us = esp_timer_get_time();
  memset(&fb_, 0, sizeof(fb_));
  fb_.buf = const_cast<uint8_t *>(jpeg_data_);
  fb_.len = jpeg_data_len_;
  fb_.width = kFrameWidth;
  fb_.height = kFrameHeight;
  fb_.format = UVC_FORMAT_JPEG;
  fb_.timestamp.tv_sec = now_us / 1000000ULL;
  fb_.timestamp.tv_usec = now_us % 1000000ULL;

  return &fb_;
}

At this point, the webcam is extremely boring - it doesn’t actually move. But it does work!

Webcam preview showing BBC test card

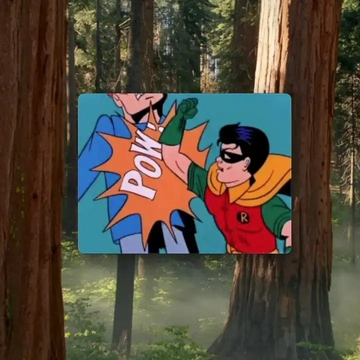
Demo 2: Animated GIFs

A static image is fine, but webcams are meant to move.

For this demo:

  • An animated GIF is embedded into the firmware
  • Each GIF frame is decoded and then re-encoded as a JPEG at boot time
  • The JPEG frames are sent over USB at the correct times

To get the gif down to a sensible size to fit in the flash I used ezgif to resize and optimize it to 320x240.

GIF Decoding

We use Larry Bank’s excellent AnimatedGIF library to extract frames and timing information .

Even though this is a highly optimised library, decoding gifs is surprisingly intensive - with our 320x240 images it takes on average just under 33ms per frame.

JPEG Encoding

Each decoded frame is then encoded as a JPEG. We use the Espressif esp_new_jpeg component for this. According to the docs this should be able to encode a 320x240 images at 40fps.

In my tests we got around 23ms per frame - which is pretty impressive and would be 45fps!

Batman!

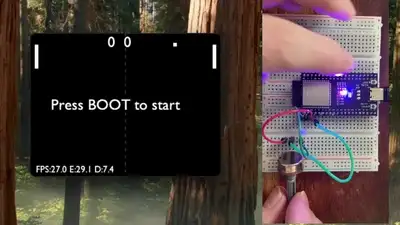
Demo 3: Pong as a Webcam

So, can we use our “webcam” for something more fun? How about as a real time display of a game?

For something real time and interactive like a game we need to be getting close to at least 30 FPS.

At 30 FPS we have a budget of 33ms per frame. Given our JPEG encoding takes around 23ms we only have 10ms per frame for everything else!

Game Loop Constraints

Each frame must:

  1. Update game logic
  2. Render the framebuffer
  3. Encode the frame as JPEG
  4. Send it over USB

Pseudo code for this is below:

// simplified main loop
while (true) {
    wait_for_host_frame_request();
    update_game();
    render_frame();
    jpeg_encode();
    send_jpeg();
}

With careful tuning, this just about works — and the result is a fully playable game of Pong streamed through a standard webcam interface. The key detail is that the host paces the loop: the ESP32 renders/encodes a new frame when the UVC stack asks for one.

In my initial tests I got just under 29FPS. After some recent optimisations (I got the JPEG encoding down to around 21ms) I hit a solid 30 fps! Not a bad result.

Pong Cam

What’s Next

In a follow-up project, we’ll replace the generated frames with a real camera sensor - it should be pretty straightforward.

#ANIMATED GIF #BULK TRANSFER #DIY HARDWARE #EMBEDDED #ESP32-S3 #ESPRESSIF IDF #ESP_NEW_JPEG #JPEG ENCODING #MICROCONTROLLER GRAPHICS #MJPEG #PONG #REAL-TIME #TINYUSB #USB UVC #WEBCAM

Related Posts

Decoding AVI Files for Fun and... - After some quality time with my ESP32 microcontroller, I've developed a version of the TinyTV and learned a lot about video and audio streaming along the way. Using Python and Wi-Fi technology, I was able to set up the streaming server with audio data, video frames, and metadata. I've can also explored the picture quality challenges of uncompressed image data and learned about MJPEG frames. Together with JPEGDEC for depth decoding, I've managed to effectively use ESP32's dual cores to achieve an inspiring 28 frames per second. Discussing audio sync, storage options and the intricacies of container file formats for video storage led me to the AVI format. The process of reading and processing AVI file headers and the listing subtype 'movi' allowed me to make significant headway in my project. All in all, I'm pretty chuffed with my portable battery powered video player. You can check out my code over on Github!
ESP32-S3 USB UAC - I turned my new ESP32‑S3 board into a USB Audio device. After a ninja LED fix and confirming the IMU and charging, I streamed mic audio over Web Serial (with a slick AI-made ‘Audio Studio’) and then via USB UAC. The mic sounds great, but the speaker is crackly over UAC—even though I2S WAV playback is perfectly clean. ESP-IDF worked; Arduino didn’t. Bonus annoyance: macOS vs Windows is a toggle, not a combo. Still, this board passes QA.
Easy esp32 s3 dev board - Quick recap: I’m putting together a super simple ESP32-S3 dev board—there’s a video walkthrough, the full KiCad project on GitHub, plus the schematic and a slick 3D render of the assembled board.
ESP32-S3 Dev Board Assembly - I finally assembled our ESP32-S3 dev boards—used a stencil for easy SMD work, fixed a few tiny USB solder bridges with flux, and even hand-built one for fun. The EPAD isn’t required (per the datasheet), power LEDs look good, and on macOS you can spot it under /dev before flashing. A quick boot-button dance and the blink sketch runs great—full build and walkthrough in the video.
This number does nothing - Ever wondered about the ubiquitous 'Serial.begin(115200);' in your Arduino projects? It turns out, with boards like the ESP32-S3 offering native USB support, this baud rate doesn't really matter when streaming data. My tests even showed surprising results with different speeds using Arduino and ESP-IDF, highlighting potential in USB full-speed capabilities. I dove into raw performance testing, and saw deviations from expected UART limits. Check out the full video and explore the results if you're curious about maximizing your data transfer speeds!

Related Videos

My ESP32S3 Thinks It's a WebCam! - I turned a vanilla ESP32-S3 dev board into a USB UVC webcam that doesn’t use a camera at all—first streaming a static test card, then an animated GIF, and finally a real-time Pong game. The ESP32 pre-decodes GIF frames to RGB, JPEG-encodes them, and streams MJPEG, and for the live game it renders to a framebuffer, JPEG-encodes in ~23 ms, and just about hits 30 fps. There’s room to optimize (dual-core draw/encode), and this approach is great for dashboards, sensor visualizations, or testing video pipelines. Shout out to PCBWay for the boards—they turned out great.
Streaming Video From an SD Card on the ESP32. - In this video, we successfully navigated the convoluted process of setting up movie file playback from an ESP32 with an SD card. There were a few bumps along the way, such as confusing USB data pins and the intricacies of various video container formats, but our quirky PCBWay board came through. Discussed an ingenious method of creating a simple custom video container format with ffmpeg that can be effortlessly parsed by the ESP32. And yes, even though the tiny TV guys use AVI files, we pushed boundaries and learned a thing or two about list chunks, sub formats, and hex dumps. The result? We achieved smooth audio playback and video frame skipping for an optimal balance. Check out the streaming version on WiFi for more fun!
ESP32-S3 - Which Pins Are Safe To Use? - In this video, I've decided to dive deep into the ESP32-S3, a module ruling my lab recently due to its plug-in-and-play functionality, and the flexibility offered by its GPIO matrix. However, working with it requires vigilance, especially with regard to the strapping pins and USB data pins, among others. Discovering such quirks, I've encountered unexpected values, short glitches and the occasional code crash. To help you avoid these bumps, I've documented everything I've learned on my GitHub repo, where I'm inviting you, my fellow makers and engineers, to contribute your valuable experiences and findings. After a minor hiccup with my ESP32-TV, expect an updated PCB design, courtesy of PCBWay. Explore the ESP32-S3 with me, and let's unravel its secrets together, one pull request at a time.
Stop Using printf() - Debug ESP32 the Right Way - Right, let’s give this a go. Instead of drowning in printf()s and blinking LEDs, I show how the ESP32-S3’s built‑in USB JTAG lets you hit Debug in the Arduino IDE (or PlatformIO) and actually step through code. We set breakpoints, add watch expressions, use conditional breakpoints, and even edit variables live with a simple FizzBuzz/LED demo. It’s quick, it works, and it beats “works on my machine”—just mind real‑time code and ISRs. Works on ESP32s with native USB.
I Built My Own ESP32-S3 Board… And It Actually Works! - I finally assembled my super simple ESP32‑S3 dev board—voltage regulator, reset button, three status LEDs (5V, 3.3V, and a GPIO blinker), and all pins broken out. I showed two build methods: stencil + hot-plate reflow (quick, with a few USB bridges to clean up) and full hand-solder under the microscope, complete with the rigorous ‘solid’ test. Soldered the ESP32‑S3 module (skipping the center thermal pad unless you need it), plugged in, got power LEDs, confirmed USB enumeration, flashed a blink sketch, and we’ve got a blinking LED. Next up: turning this basic dev board into something more professional for production.
HELP SUPPORT MY WORK: If you're feeling flush then please stop by Patreon Or you can make a one off donation via ko-fi
Want to keep up to date with the latest posts and videos? Subscribe to the newsletter
Blog Logo

Chris Greening


Published

> Image

atomic14

A collection of slightly mad projects, instructive/educational videos, and generally interesting stuff. Building projects around the Arduino and ESP32 platforms - we'll be exploring AI, Computer Vision, Audio, 3D Printing - it may get a bit eclectic...

View All Posts